Description
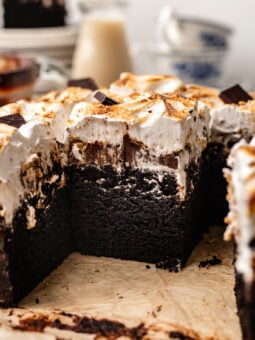
This molten vegan s’mores cake contains layers of super rich, velvety moist chocolate cake, crushed homemade graham cracker, warm chocolate ganache, silky chocolate buttercream, and toasted vegan marshmallow fluff! And each bite gets better and better!!
Ingredients
- 1 1/4 cup (300 mL) vegan buttermilk, room temperature
- 3 cups (375 g) all purpose flour or gluten free 1:1 baking flour, sifted
- 1 cup (95 g) black cocoa powder, sifted
- 2 tsp baking powder
- 1 1/2 tsp baking soda
- 1/2 tsp sea salt
- 1 3/4 cups (350 g) granulated sugar
- 1/3 cup (110 g) brown sugar
- 1/2 cup (113 g) unsalted vegan butter*, room temperature
- 1 cup (220 g) unsweetened applesauce or dairy free yogurt, room temperature
- 1 tsp vanilla extract
- 1 cup (240 mL) hot water + 1 tsp dissolvable espresso powder (or 1 cup (240 mL) brewed coffee, decaf if desired)
- 1 cup (130 grams) vegan chocolate chips
Chocolate “milk” soak:
- 1/2 cup (120 mL) vegan heavy cream
- 1/3 cup (60 g) vegan chocolate chips
S’mores Filling:
- 1 batch vegan graham crackers
- 1 batch vegan chocolate ganache
Vegan Vanilla & Chocolate Buttercream:
- 1 batch vegan vanilla buttercream
- 1/2 cup (50 grams) cocoa powder
- 1/4 cup (57 grams) unsalted vegan butter, room temperature
Eggless Marshmallow Meringue
- 1/2 cup (50 grams) unsalted aquafaba*
- 1 tsp cream of tartar
- 1 tsp vanilla extract
- 1/2 cup (100 g) granulated sugar
Additional Toppings:
- Vegan marshmallows
- Extra vegan GF graham crackers
Instructions
- Be sure to read all instructions before beginning. Measure out all ingredients for the cake. See notes for sheet cake instructions!
- Prep: Preheat the oven to 350F, and prepare three 8″ cake pans. You can use 6″ cake pans if you’d like. Grease the bottoms and sides of the pans and line the bottoms with parchment paper. Set aside. Prepare the vegan buttermilk by mixing together the dairy-free milk and apple cider vinegar in a small bowl and set aside for 5-7 minutes to curdle. You can prepare the batter while the buttermilk is forming.
- Make the batter: in a medium bowl, whisk together the flour, cocoa powder, baking powder, and baking soda. Set aside. In a stand mixer with paddle attachment or a large bowl and a hand mixer, cream the vegan butter until fluffy, about 2-3 minutes. Add in the sugars, and cream together again until the sugar begins to slightly dissolve into the vegan butter, about 2-3 minutes. Scrape down the sides of the bowl and bottom of the bowl as needed. Then add in the applesauce, and mix again on medium speed until combined. To the mixture, add in about half of the flour mixture, along with half of the buttermilk. Mix on medium speed until the flour starts to combine with the wet. Add in the remaining flour mixture and buttermilk, and mix again just until there are no more dry streaks. Slowly pour in the hot espresso, and mix on medium speed until the coffee has just mixed into the batter. If using a stand mixer, remove the bowl from the stand mixer. Add in the chocolate chips and fold until they are just distributed throughout the batter.
- Bake the cakes: pour the batter into the three cake pans evenly. Place the cakes into the oven and bake for 35 minutes, or until a toothpick comes out clean. If using three 8″ cake pans, the cakes will bake a bit quicker. Remove the cakes from the oven and allow them to cool in their pans for 10 minutes. Then carefully transfer them to a cooling rack to cool completely, about 1 hour.
- While the cake is baking: Prepare the milk soak similarly to the ganache by heating the vegan heavy cream until hot in a saucepan or microwaving in a microwave safe bowl. Add in the chocolate chips and stir until melted. Set aside to cool. Also prepare a batch of the vegan ganache according to instructions at this point for it to cool properly.
- While the cakes are cooling: make the graham crackers according to the instructions and ganache. Once the graham crackers are baked, set them aside to fully cool for 10 minutes. Then take half of the graham crackers and blitz them in a food processor to create graham cracker crumbs. This will be for the filling of the cake. Your cakes should be ready to frost at this point.
- Soak the cake: For both the sheet cake option and the regular layer cake option, poke holes in the tops of the cake layers and brush the milk soak over top.
- Make the frosting: when you’re ready to make the frosting, prepare the vegan buttercream frosting according to instructions (you’ll save the extra cocoa powder and butter for after you’ve created the first crumb coat). It’s also a good idea to prepare the vegan chocolate ganache if you’d like to use that for this recipe. Follow the instructions for making the ganache, then allow the ganache to cool as you frost the cake.
- Assemble the s’mores cake: to assemble the cake, frost the top of the bottom layer of the cake using about 1/3 cup frosting, then create a wall of frosting (see photos in the blog post). Add about 1/3 cup graham cracker crumbs in the middle and 1/3 cup ganache spread over the crumbs, and place the next layer of cake on top. Repeat for the second layer, placing the third layer on top. Use about 1/2 cup-3/4 cup frosting to create a very light crumb coat around the cake, scraping and smoothing the sides as needed. Place the cake in the fridge to chill for 20 minutes. You’ll have leftover ganache for topping the cake.
- Make the chocolate buttercream: You should have about 2-3 cups of frosting leftover. Add in the room temperature butter and cocoa powder to the mixing bowl, and cream together until smooth. You can add more powdered sugar as well to make a slightly sweeter chocolate buttercream. When your cake is ready for the final layer of frosting, remove the cake from the fridge. Frost the entire cake with the chocolate buttercream, smoothing the sides with a bench scraper as needed.
- Create the chocolate drip: the chocolate ganache should be cool now. Pour the chocolate ganache into a piping bag, and when ready to pipe the ganache around the edges of the cake, cut a small whole at the bottom of the bag. Carefully pipe the drip around the top of the cake, covering the top of the cake. Cupcake Jemma has a great video tutorial. Top the ganache with leftover crumbled graham cracker, and place the cake back into the fridge to set.
- Make the vegan marshmallow meringue: the final step is making the marshmallow meringue! In a large stand mixer with whisk attachment, add the aquafaba and cream of tartar to the bowl. Beat the mixture on the highest setting for 7-8 minutes, until stiff peaks form. If it’s already 8 minutes and stiff peaks haven’t formed, continue beating the aquafaba mixture. It’s very hard to over mix aquafaba, so don’t worry about ruining the mixture. Once you have stiff peaks, or near stiff peaks, add in the vanilla extract. Then add in the sugar 1 tablespoon at a time.
- Top the s’mores cake: remove the cake from the fridge and top or pipe the marshmallow meringue on top. You can pipe the meringue or top it as I did. Top with any remaining graham crackers and vegan marshmallows. Use a culinary blow torch to lightly toast the marshmallow. Serve and enjoy!
- Storage: if you have any remaining slices, store them wrapped and in an airtight container in the fridge for up to 5 days, or in the freezer for up to 1 month.
Equipment
 Buy Now →
 Notes
Sheet cake option: You’ll follow the instructions for baking the cake except bake it in a 9×9 baking pan for 55-60 minutes, or until a toothpick comes out clean. I also forgo the chocolate buttercream and just use the chocolate ganache as the frosting.
Gluten free: to make this vegan s’mores cake entirely gluten-free, you can use gluten-free 1:1 baking flour, such as King Arthur Gluten-Free Measure for Measure glour, for both the cake and the graham cracker recipe. Everything else in the recipe is entirely gluten-free. Be sure to use the cup measurements for the flour if using gluten free.
Aquafaba: this is an entirely eggless s’mores cake, down to the marshmallow meringue. Aquafaba is the water from a chickpea can. It’s perfectly fine to consume.
Please read the full post for all tips & tricks!
