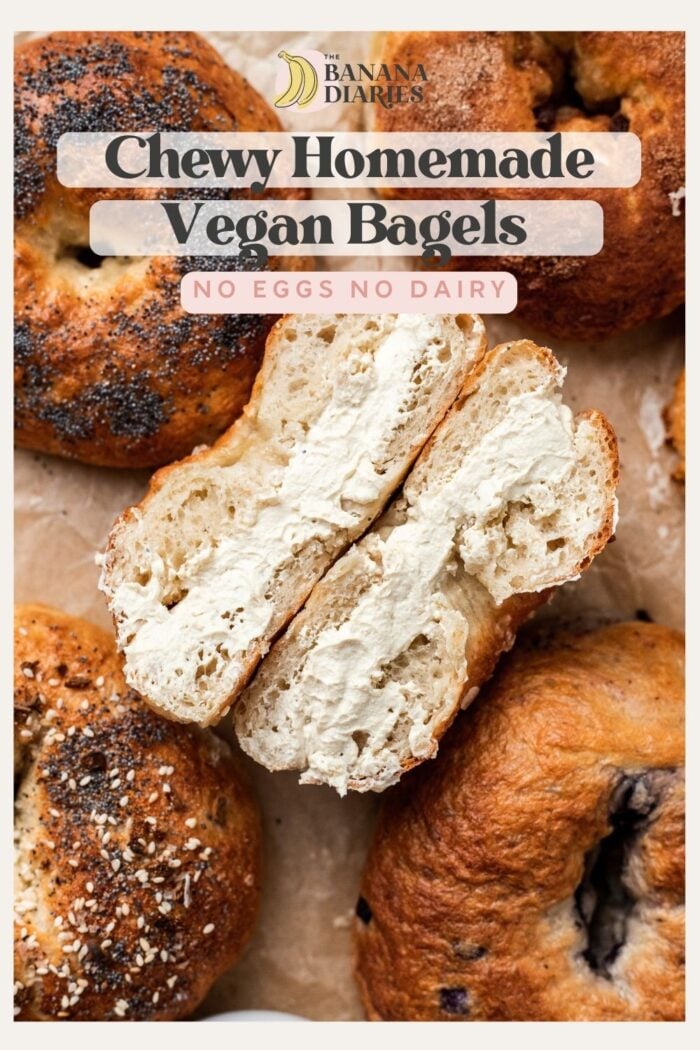
Homemade Chewy Vegan Bagels
Learn how to make the best chewy homemade vegan bagels ever! These easy vegan bagels taste just like a New York style bagel, without leaving home!

Chewy Homemade Vegan Bagels from the comfort of your own home:
Growing up near New York City and eventually living there, I’ve tried a few New York bagels in my time, and I can honestly say that these homemade vegan bagels are just like the New York ones…but even better!
Chewy, dense, and soft, this easy vegan bagel recipe yields the best tasting bagels I’ve ever had. And it’s such a good base, I even used it for my cinnamon raisin bagels.
Just simple, good ol’ bagels.
Trust me, you will never go back to store-bought bagels again; this vegan bagel recipe is all you need! Spread with some vegan cream cheese or vegan mascarpone, you have yourself the best bagel around.

Ingredients + Substitutions
These homemade vegan bagels are entirely oil free, egg free, dairy free, and nut free (if needed!). They’re super simple in ingredients so that anyone can make these homemade bagels!
- Active dry yeast: I like to use active yeast here, but you can use instant yeast as well. The process will be even faster!
- Warm water: you’ll need the water to be 110F to properly activate the yeast.
- Maple syrup: Or you can use brown sugar or coconut sugar, very similar to brown sugar.
- Flour: you can use all purpose or bread flour here. Bread flour is recommended over all purpose, but you’ll still achieve a very good chewy and dense soft vegan bagel.
- Arrowroot powder: this helps get that chewy texture!

How to make homemade vegan bagels
Making these oil free vegan bagels is a lot easier than you might think! It can be broken down into three basic sections: making the dough, shaping and boiling the bagels, and finally, baking the bagels!
A reminder: I have the full instructions with measurements listed down below in the recipe card, but I wanted to make sure we go over them thoroughly here!
Step 1: the bagel dough
The start of the vegan bagel dough is very similar to any bread making process, like in my vegan focaccia recipe or my vegan cinnamon rolls.
Simply activate the yeast by combining the hot water, coconut sugar, and a spoonful of flour. Add in the yeast and cover to activate for 10 minutes. I recommend placing the bowl in a warm area.
Once activated, you’ll add in the remaining ingredients. You can use a stand mixer or do this by hand. If doing by hand, you’ll need more flour.
Either way, you will finish the dough by kneading it by hand for about 5 minutes.

Then place the dough into the bowl, cover, and allow the dough to double in size. Once doubled in size, you can move onto shaping the bagels!
Step 2: shaping & boiling the vegan bagels
You might see some people roll the bagel dough into a long cylinder than pinch it together to make it into a bagel…there is a much better way to do this that’s actually a lot easier.
Plus your bagels will look more bagel-y 😉
Simply divide your proofed dough into 8 even sections. I like to use my pastry cutter. Roll each section into a ball, and lightly press your thumb into the middle of the dough.


You don’t want a gaping hole, or else your bagels will be sort of flimsy. Simply work your fingers around the dough to create a hole less than an inch wide.
Less is more here.
Then we’ll boil them! To boil the bagels, simply bring a large pot of water to a boil. Use either a spatula or a large spoon with holes in it for draining, and carefully transfer a bagel into the boiling water. It should float.
You’ll cook the bagel for 1 minute on each side. Once cooked, transfer it back to the parchment paper and repeat for the remaining bagels!
Step 3: topping & baking the bagels
If you don’t want just plain bagels, you’ll top the bagels with your desired toppings before baking!

You can top your bagels with:
- sesame seeds
- poppy seeds
- everything but the bagel seasoning
- dried onion
- flaked sea salt
- cinnamon sugar
Once your bagels have been topped, you’ll bake them for just 20-23 minutes at 425F.
No need to make any glaze!

What to serve on your bagels
I personally love a smear of vegan cream cheese, especially my homemade 3-ingredient vegan cream cheese. I also have 7 different flavor variations in that homemade dairy free cream cheese post to keep it fun!
However, if you want a sweeter route, I highly recommend smearing a pat of vegan butter and sprinkling with a bit of cinnamon, sea salt, and a drizzle of maple syrup! My favorite vegan butter to use here is Forager Project.
If you’re not nut-free, you can also use almond butter, cashew butter, peanut butter, or the like. Even coconut butter would be lovely!
How to store homemade bagels
I recommend storing these bagels in an airtight sealed bag. When you’re sealing the bag, squeeze out all of the air so that your bagels stay extra fresh.
You can either refrigerate your bagels for up to 5 days or freeze them for up to 3 months.
To reheat, simply toast them or bake them for a few minutes (about 5-7) in the oven!

I hope you love these homemade vegan bagels as much as I do!
As always, I absolutely love to see your beautiful creations on Instagram and Pinterest, so be sure to tag me there!
Happy vegan bagel making!
Want to save this recipe for later? Add it to your favorite recipe board on Pinterest!
If you make this recipe, please be sure to leave a comment and a rating ⭐️⭐️⭐️⭐️⭐️ below. This helps others to find the recipes! As always, I absolutely love to see your beautiful creations on Instagram and Pinterest, so be sure to tag me there as well!
Print
Homemade Chewy Vegan Bagels
- Prep Time: 60
- Cook Time: 18
- Total Time: 1 hour 18 minutes
- Yield: 8 1x
- Category: Breakfast
- Method: Baking
- Cuisine: American
- Diet: Vegan
Description
Learn how to make the best chewy homemade vegan bagels ever! These easy vegan bagels taste just like a New York style bagel, without leaving home!
Ingredients
- 2.5 tsp activated dry yeast
- 1 1/2 cups (375 mL) filtered water, heated to 110F
- 2 tsp maple syrup, room temperature
- 4 1/8 cups (520 g) bread flour*
- 1 tbsp cornstarch or arrowroot starch
- 1/2 tsp sea salt
- Desired toppings (see blog post for measurements!)
Instructions
- Please read through all instructions before beginning.
- Measure out all ingredients before beginning. Make sure that your water is 110F when you bloom the yeast.
- Bloom the yeast: to a medium bowl, combine the water, dried yeast and maple syrup. Mix with a wooden spoon, cover and set aside to rest for 10-15 minutes. The yeast should start to form foam at the top of the water and begin to smell yeast like. If it does not, you might need to start from scratch (easier to do it at this stage!). As the yeast is blooming, grease a large clean bowl with olive oil. This will be for the first proof. Set aside.
- Make the bagel dough:in a large bowl, whisk together the flour, cornstarch, and salt. Then in a stand mixer with dough attachment or in a large bowl and wooden spoon, add the yeast mixture, vanilla extract, maple syrup, and about 1/3 of the flour mixture. Mix on medium speed for 1 minute, then stop and add in the remaining flour. Mix on medium speed to begin, then to medium-high speed to knead the dough for 2-3 minutes.
- Knead the dough: On a clean floured surface, lightly flour the dough and begin to knead the dough for 5-7 minutes. The dough should be smooth and easily formed into a large ball.
- Proof the dough: place the bagel dough into your clean greased bowl and cover with a clean kitchen towel. Place in a warm area that’s at least 85F to proof until doubled in size, about 45-60 minutes. While the dough is rising, line two baking sheets with parchment paper.
- Shape the bagels: once the dough has risen, lightly punch down the dough, and flour a clean surface once more. Lightly knead to deflate the dough on the surface, then divide the dough to be 8 even sections using a bench scraper or large kitchen knife. It’s easiest to lightly flour the knife before slicing the dough. Take one piece of bagel dough and lightly knead it into a small and smooth ball. Press your thumb into the middle of the dough ball to form into a bagel. Place the formed bagel onto a baking sheet lined with parchment paper. Repeat for the remaining dough balls, placing four bagels onto each baking sheet spaced apart.
- Second proof: cover each baking sheet with a clean kitchen towel, and allow the dough to rise for 30 minutes.
- While the bagels are rising: bring a large kitchen pot with 4 quarts of water to a boil. Preheat the oven to 425F.
- Once the water is boiling: use a slotted spatula and carefully place one bagel at a time into the boiling water. I place about two bagels into the pot to boil together. Allow the bagels to boil for 1 minute, then carefully remove them with the slotted spatula and place them back onto the baking sheet. They will be very puffy! Repeat for the remaining bagels.
- Before baking: Add your toppings (sesame seeds, dried onion, poppy seeds, sea salt, etc.)
- Bake the bagels: place the baking sheets into the oven to bake for 20-23 minutes. About half way through, rotate the pan to make sure the tops evenly brown. Remove the bagels once the tops are lightly browned.
- Allow the bagels to cool for 10 minutes: give the bagels to cool at room temperature on a cooling rack for 10 minutes before slicing. Then serve with vegan cream cheese, vegan butter, peanut butter, cashew butter, or enjoy as is!
- Storage: store any leftover bagels in an airtight bag or container at room temperature for up to 2 days, in the fridge for up to a week, or in the freezer for up to 2 months.
Notes
See blog post for tips & tricks!


Could I use corn starch instead of arrowroot in the gf version? Also do you think normal Greek yogurt would work?
Greek yogurt would definitely work here! You can use corn starch, but I don’t think it yields the best results. While cornstarch and arrowroot powder are pretty interchangeable, I think that the arrowroot powder gives these bagels that chewier texture!
Hi
Can this recipe be used for burger buns too?
Hi Manisha! Hmm it might be too dense for burger buns- I usually think of burger buns as more light + fluffy! I’m sure it would make a good bun, but it will be on the denser side!
Ahh. You are amazing!! I’ll be making these tomorrow for sure!
Aw so so happy to hear it!! Enjoy!!
Hey! When is the baking powder used in the gf bagel recipe?
Hi Sienna! So sorry for the confusion! It will be whisked with the flour, arrowroot powder, and sea salt 🙂
Any ideas on if 1/2 whole wheat, 1/2 bread or AP would get the same rise?
I don’t bake much with whole wheat flour unfortunately! I’m so sorry! I would use either bread flour or AP!
Hi! I have gf bread flour… if I used that should I use yeast or baking soda? Also, would tapioca or cornflour work as a replacement for arrowroot? Thank you!
Hi Isabelle! So I haven’t perfectly used gf bread flour here so I can’t speak to its results! For using tapioca or corn vs arrowroot, I would stick with arrowroot. I tested it with tapioca and didn’t like the results (and another reader actually made it with tapioca as well and they didn’t work!). I hope that helps!
I was originally going to half the recipe, but after messing up the water I decided to just make the whole thing. Boy am I glad that I did!! I took one bite and almost cried, they’re so close to real bagels. I love the slight sweetness of the oat flour and the chewy texture, and that it doesn’t upset my stomach at all! I even threw in some chocolate chips for a few and some walnuts into another, I can’t wait to devour these this week!!
Oh my goodness!! You are so so sweet, I’m so happy to hear you loved them!! Also LOVE that you topped with chocolate chips- sweet bagels are my go to as well 🙂 ENJOY!!
So excited to try this!!! For the yeast free version any vegan yogurt is fine? I have the lava just wanted to make sure that would work before I try
Hi Danielle! Aw wonderful! You can definitely use any vegan yogurt for this! Lava will work great!
May I use oat flour with the yeast version? So excited to try these!!!
Hi Leah! You can, but I will say it won’t rise as much! I’m still working on getting the perfect gluten free yeasted version (for both bagels and cinnamon rolls ha!). If you can’t do baking powder, you can also the same amount in baking soda with 1 tsp apple cider vinegar, white wine vinegar, or lemon juice. It will give the same reaction!
what I can I use instead of the yogurt (dairy free please)
Hi Michelle! You can also use coconut cream (scooped from the can- just the fat!), same measurements as the yogurt, with 1 tsp lemon juice!
Can I use cassava flour instead of arrowroot?
Hi Alma! I recommend using tapioca or arrowroot here if you can- the cassava won’t act quite the same, as it’s processed in a different way. I hope that helps!
I just made the gluten free bagel recipe today and I was somewhat skeptical of the recipe at first. To my surprise they turned out soooooo good! I also made a vegan Serrano and green onion cream cheese to go with and wow such great flavor! The bagels are chewy just like real bagels. I also added everything bagel seasoning to mine. So delicious! I will definitely make them again!!
WOO that’s awesome!! Love the homemade Serrano green onion spread too 🙂 YUM! Thanks for the rating, and enjoy!
I made both recipes .bagel
I am gluten free .
They are absolutely delicious. I am so exited . I finally have a good recipe that i love after trying so many.
For the dairy free. I use soya milk with 1 teaspoon apple cider vinegar
Cook them for 25 min. They are easy and fast .
You are genius.
I also made the one with yeast and replace the flour with roll oat that i change in flour.
Cook them for 25 minutes.
Thank you thank you. 🙏
Ps; my daughter is going to be so happy. we love bread.
Hi! Could I use coconut yogurt for the dairy free yogurt?
Absolutely!
I made the gluten free recipe yesterday!! They turned out alright but they are really dense. How do I make them fluffier?
I’m so sorry to hear about the denseness!! Did you happen to use homemade oat flour or store bought? I’ve found they are a bit denser with homemade oat flour, but store bought should yield a texture more similar to the regular flour!
I even used store bought!
Hi! I made the gluten free bagels yesterday for the first time and we all loved them-even the members of my family who are not gf! However, I have to say that I misunderstood the way the recipes were written and used all the ingredients from BOTH recipes (except for the regular white flour), so I actually used yeast and baking powder! I did end up adding an additional cup of flour and for that I used an all purpose gf flour (I was too lazy to blend anymore oats) and I also used that flour for kneading the dough. The bagels turned out great! I let them rise and everything and the dough rose nicely as well. They were a bit dense, but not too dense. We ate ours plain with butter, but they would probably be amazing toasted! My 8 year old, who can’t have gluten, was so, so happy to have them! Thank you so much for this!
These bagels were pretty good! I made the gluten free vegan one. They had the chewy textures and easy to make. However, when i sliced the bagels in the half, the texture is too smooth or too dense. And it’s very hard to spread anything on it as it’s too smooth. Am I missing something? The first time I thought I had not boiled the bagels long enough. The second time, i boiled them a little longer and they still came out that way. Maybe I need to bake them longer? Or I am not using enough baking powder?
What can u use inside gf bagels no yeast/ sub for the cornstarch I am looking for .?
Arrowroot starch!
WOW such a great recipe!! Personal taste is a little more salt … can’t wait to try cinnamon raisin ones next x
Made them this morning- turned out gummy and very thick. Used the yeast free recipe. Help!
I’m so sorry to hear this! Can you walk me through if you changed anything?
you say this is gluten free but you write flour. I’m not sure what flour you are talking about. Help! What is bread flour? and then I see oat flour in one of the comments..
So sorry for the confusion!! Originally, I had the gluten free version in the same blog post as the regular flour version- the gluten free version is *almost* done being written and will be linked in this post (and I’ll come back here to comment!) with the gluten free bagel because I didn’t want to cause any confusion! This is just the regular flour version- but the gluten free version will be up within the next day or two! Just want to make sure I have all the tips written in that blog post that relate ONLY to gluten free! 🙂
I took a look at your cinnamon raisin recipe after this, and noticed there’s no Nutrition Facts on this one. Although there was for the raisin. Can you kindly update with Nutrition Facts?
HI! Are these healthy and good for you??
Hi Lexi- I can’t make any claims regarding health, as I’m NOT an expert in nutrition (i.e. a registered dietitian). What I can talk about is how these are vegan (i.e. dairy free, eggless, and made without any animal products- I’m vegan for the animals 🙂 ). I hope that helps!
Ok, thank you!
Hi! I have one more question, could I use whole wheat flour instead of bread flour?
For this recipe, it was specifically developed with bread flour with an option for all purpose flour- whole wheat requires a few tweaks and I haven’t tested it so I can’t give feedback on it, I’m so sorry!
I need dairy free and gluten free, do you have a gf version of this posted somewhere? or what gf flour can I use in place of the flour in this recipe? thanks
Hi There! Yup! Check out this dairy and gluten free bagel recipe! 🙂
Is there a gluten free version of this recipe?
Hi Liz! Check out this gluten free bagel recipe! Enjoy 🙂
Hi there! I’m planning on making these tomorrow, but there are a few inconsistencies between post and recipe card that I’d like to get soma clarity on…
The post says to boil bagels 1.5 minutes on each side, while the recipe states 1 minute period, no turning.
Then the post says to bake 15-18 minutes, while recipe states 20-23.
Just wanted to know what is correct.
I’ll probably follow the recipe card, but sometimes these things get me confused…
Hi Glenda! Thank you for the heads up on this! Sometimes we’ll update the recipes, so always follow the instructions on the recipe card at the bottom of the page for the most updated version. 🙂 Hope this helps!