Easy Flaky Vegan Pie Crust Recipe – “All Butter” Method
This undetectably vegan pie crust is SO flaky and “buttery,” and it’s super quick and easy to make in a food processor. We’re using a combination of vegan butter with vegan shortening that will give even a traditional pie crust a run for its money. Just 5 minutes of hands on work, and perfect for both sweet and savory pies!

Why you’ll love this easy vegan pie crust recipe:
You’re going to truly be obsessed with this vegan pie crust recipe. It tastes just like a classic pie crust with a beautifully flaky “buttery” texture, and the look is so professional, you’d think the pie was purchased in store.
This might even be considered the best pie crust recipe out there for the simple fact that it will please all eaters, whether or not you’re vegan! Plus, we can even make this vegan pie crust entirely allergen friendly with options for Paleo, gluten free, and nut-free!

This is the pie crust recipe that I use for my vegan pumpkin pie, sweet potato pie, and even apple pie when I want a lattice crust!
Not every pie has to have a lattice crust (or double crust). This specific recipe is just for one pie crust. But you can double it to make a double crust or use the second half of the dough for a lattice design.
Simple Ingredients
To start, you’ll need a few ingredients. If you have different dietary needs and preferences, we’ll go over those in the later sections. Let’s get to the basics first of how to make pie dough by hand:
- Flour: we have options for regular (all-purpose) and gluten free. But I highly recommend checking out either my full gluten free pie crust recipe post or my oat flour pie crust recipe for a gluten free vegan pie crust!
- Vegan butter: this pie crust can work with coconut oil as well, but you have to make sure that your coconut oil is chilled.
- Sugar or maple syrup: this option is for when making a vegan pie crust for a sweet pie. You can omit if you’re using this for a savory pie recipe.
- Avocado shortening: If you don’t have access to this, you can use more vegan butter, but the shortening will help achieve a super flaky crust, as it’s all fat (and no liquid/water content).
- Chilled water
I also absolutely love using vegan butter in the pie dough, as it yields that perfect flaky pie crust texture. However, I’ve also made my vegan pie crusts with just coconut oil or a mix of the two. Whichever method you prefer, go with it!
Overview: How to make a flaky vegan pie crust in a food processor:
Now, let’s get into how to make pie dough. I use a food processor, as it really creates the most consistent dough.
- Add the flour and salt to a food processor, and pulse the ingredients together.
- Add in the cubed vegan butter or coconut oil to the food processor, and pulse the ingredients until the mixture resembles a sand texture.
- Place the lid back onto the food processor, and begin to blend again. Remove the top insert from the lid and carefully pour in the maple syrup and water. Allow the dough to blend until it forms a large dough ball.
- Stop the food processor and remove the dough. Place the dough onto a piece of plastic wrap and form the dough into a flat disk. Wrap the dough in the plastic wrap and chill in the fridge for 30 minutes.


When you’re ready to roll out your pie crust, remove it from the fridge and dust a clean surface of parchment paper with flour. Sprinkle on a little extra onto the pie crust to make sure the rolling pin doesn’t stick to the dough.
If your dough is too cold, you need to allow the dough to soften for a few minutes at room temperature.
Roll your dough out (patience is key here) until it’s circular and about a 1/2 inch wider than the edges of your pie dish.

Gently flip the dough into the pie dish and press lightly so that the dough is lined up to the edges of the dish.


Snip away the extra, uneven edges.

Next, press your thumb between your index and middle finger knuckles with the dough between. This creates the crimp. Repeat going along the edges of the pie dough.
Then brush with a vegan egg wash (maple syrup and soy milk, almond milk, or oat milk), and you’re ready to par-bake!
Should I blind bake my pie crust?
Blind baking a pie crust is really dependent on the recipe. For instance, a no bake pie filling will require a fully baked pie crust first. A fruit pie, on the other hand, might require a partially baked, or par-baked, pie crust to ensure that a soggy bottom doesn’t happen.
If you’re blind baking your pie crust, I highly recommend letting your pie crust rest and chill in the fridge before sticking it into the oven. In fact, it’s a must.
How do you know when to blind bake a pie crust? If you’re making a pie from a recipe, hopefully the recipe developer has noted if you’re blind baking the crust or not.
Typically, you’ll blind bake (or par-bake or partially bake) a crust when you have a raw filling going into the crust that you’ll then later on bake. This prevents the crust from becoming soggy.
If you’re making a no-bake filling, then you’ll bake the crust all the way through.
Once you’ve let your crust rest for about 15 minutes, use a fork to poke a few holes into the bottom, and either use pie weights or rice or dried beans to place into the center of the crust. Make sure you put down some parchment paper, or else you’ll bake the weights into the crust!
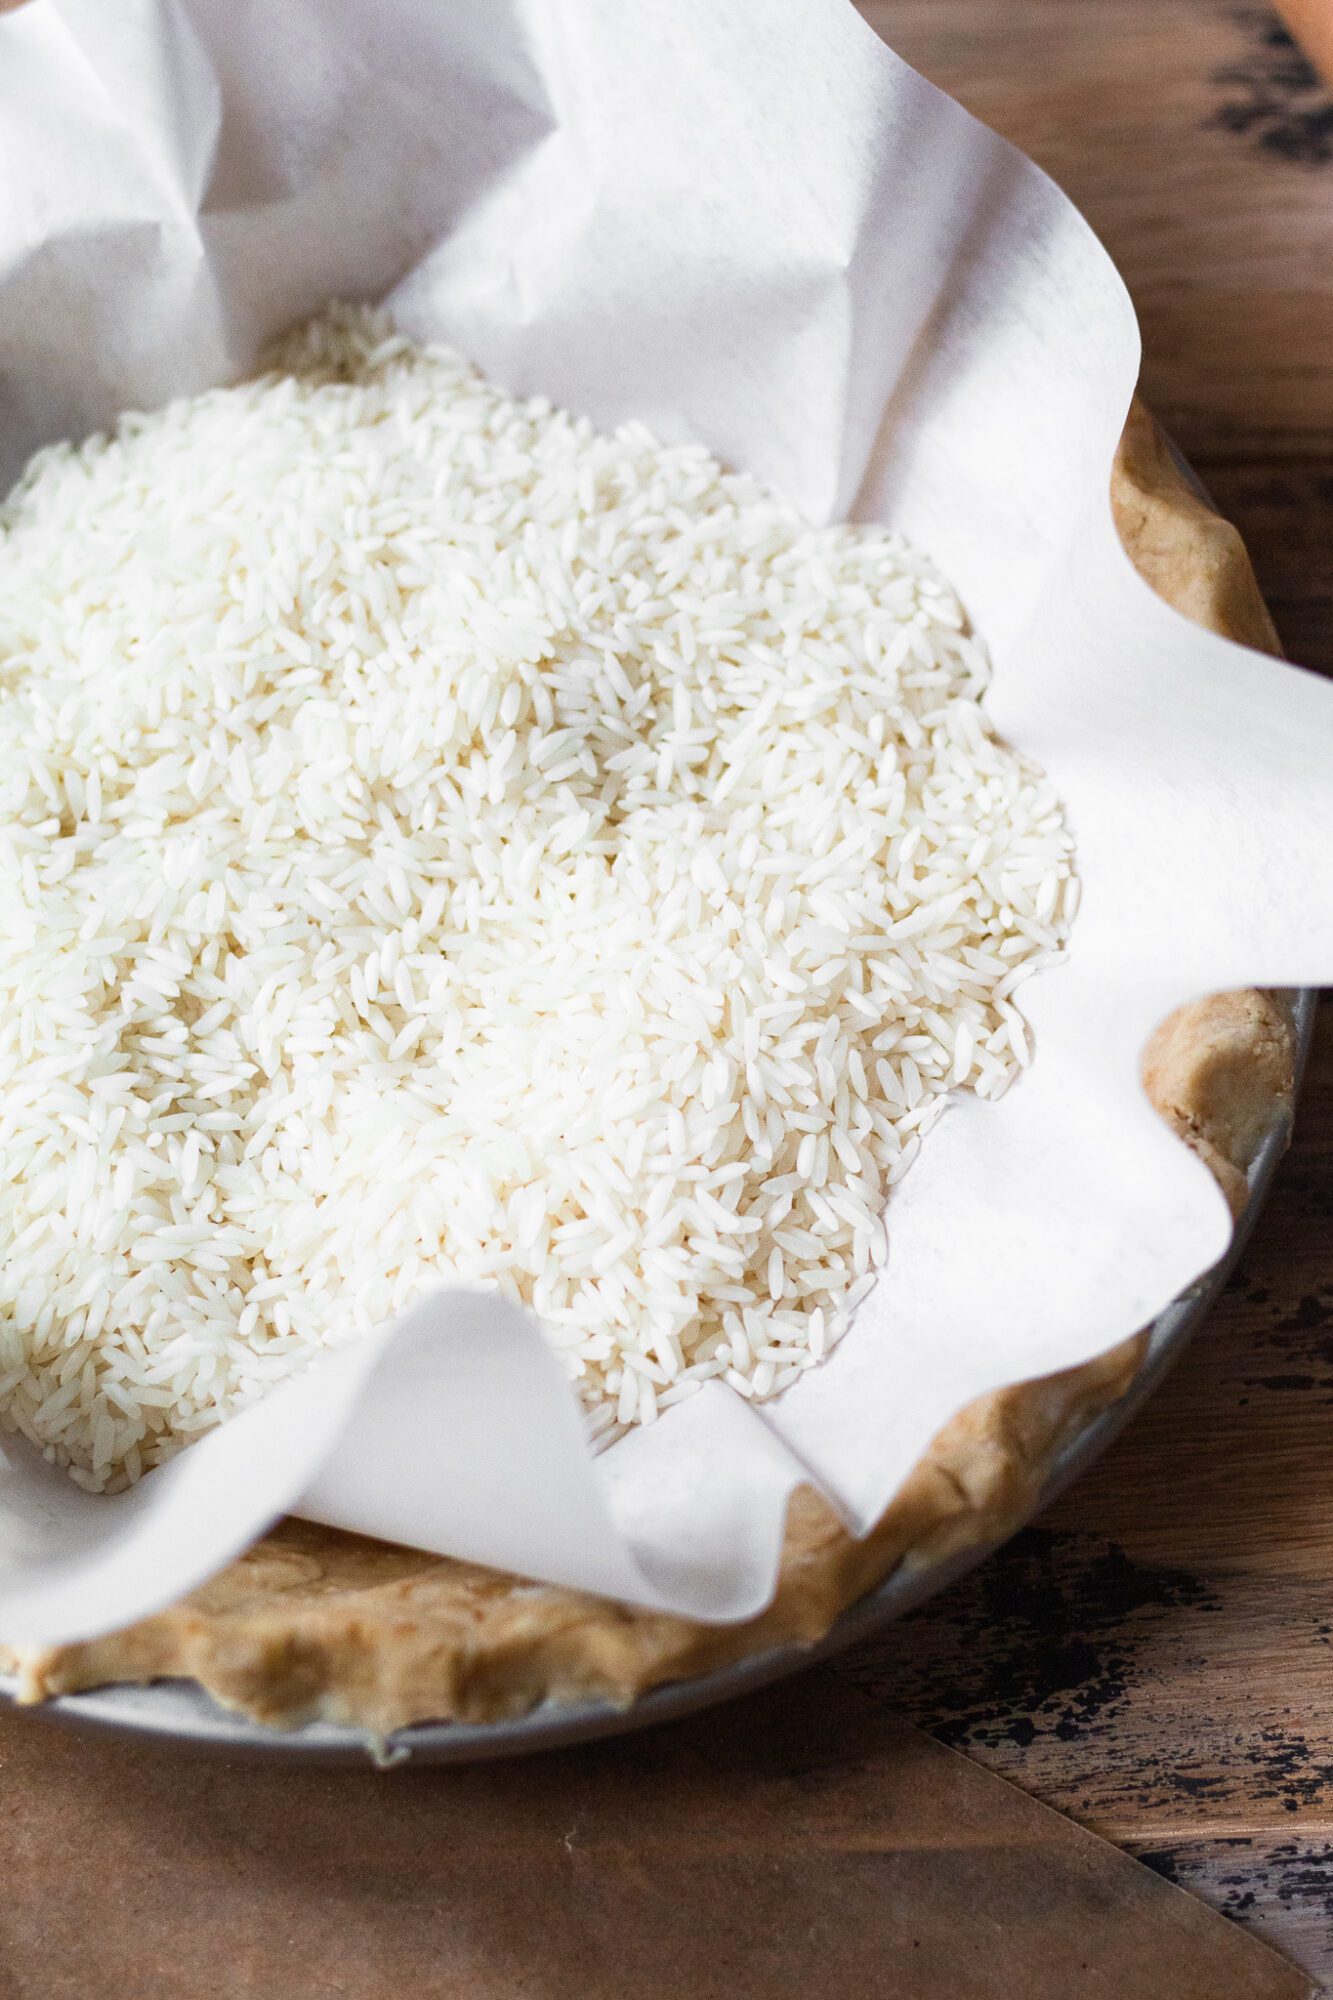
Bake your pie crust for 7-8 minutes at 375F, then let it cool before filling and baking again!
Now, if you’re baking again, be sure to cover the edges of your crust with tin foil or a pie crust saver so that they don’t burn. Nobody likes burnt crust!
How to make a lattice
My favorite thing to do is make pretty designs to go on top of pies. Whether you’re gluten free, Paleo, vegan, dairy free, or what have you, you deserve to eat a pretty pie too.
The pie crust recipe in the recipe card below is designed for a single crust, so to make a lattice crust, you’ll need to double the recipe..
Many pies that require a lattice crust don’t have you blind bake the crust beforehand (at least none that I’ve ever made, and I like making pies!), so if you’ve just finished making the bottom of your pie, let that crust rest, add the filling, and then get to making your lattice crust:
- Roll the second dough out like you did the first time, making sure to roll it wide enough for the dimensions you need. I used a 10″ pie dish, so I needed the strips to be 10″ long, and since I made each strip 1″ wide and used 10 strips, I measured 12″ in length at the minimum (for safe measure 😉 ).
- Measure each strip to be 1″ and make little dashes to keep your place.
- Use a ruler while slicing each strip. You should have 10 10″ by 1″ strips.
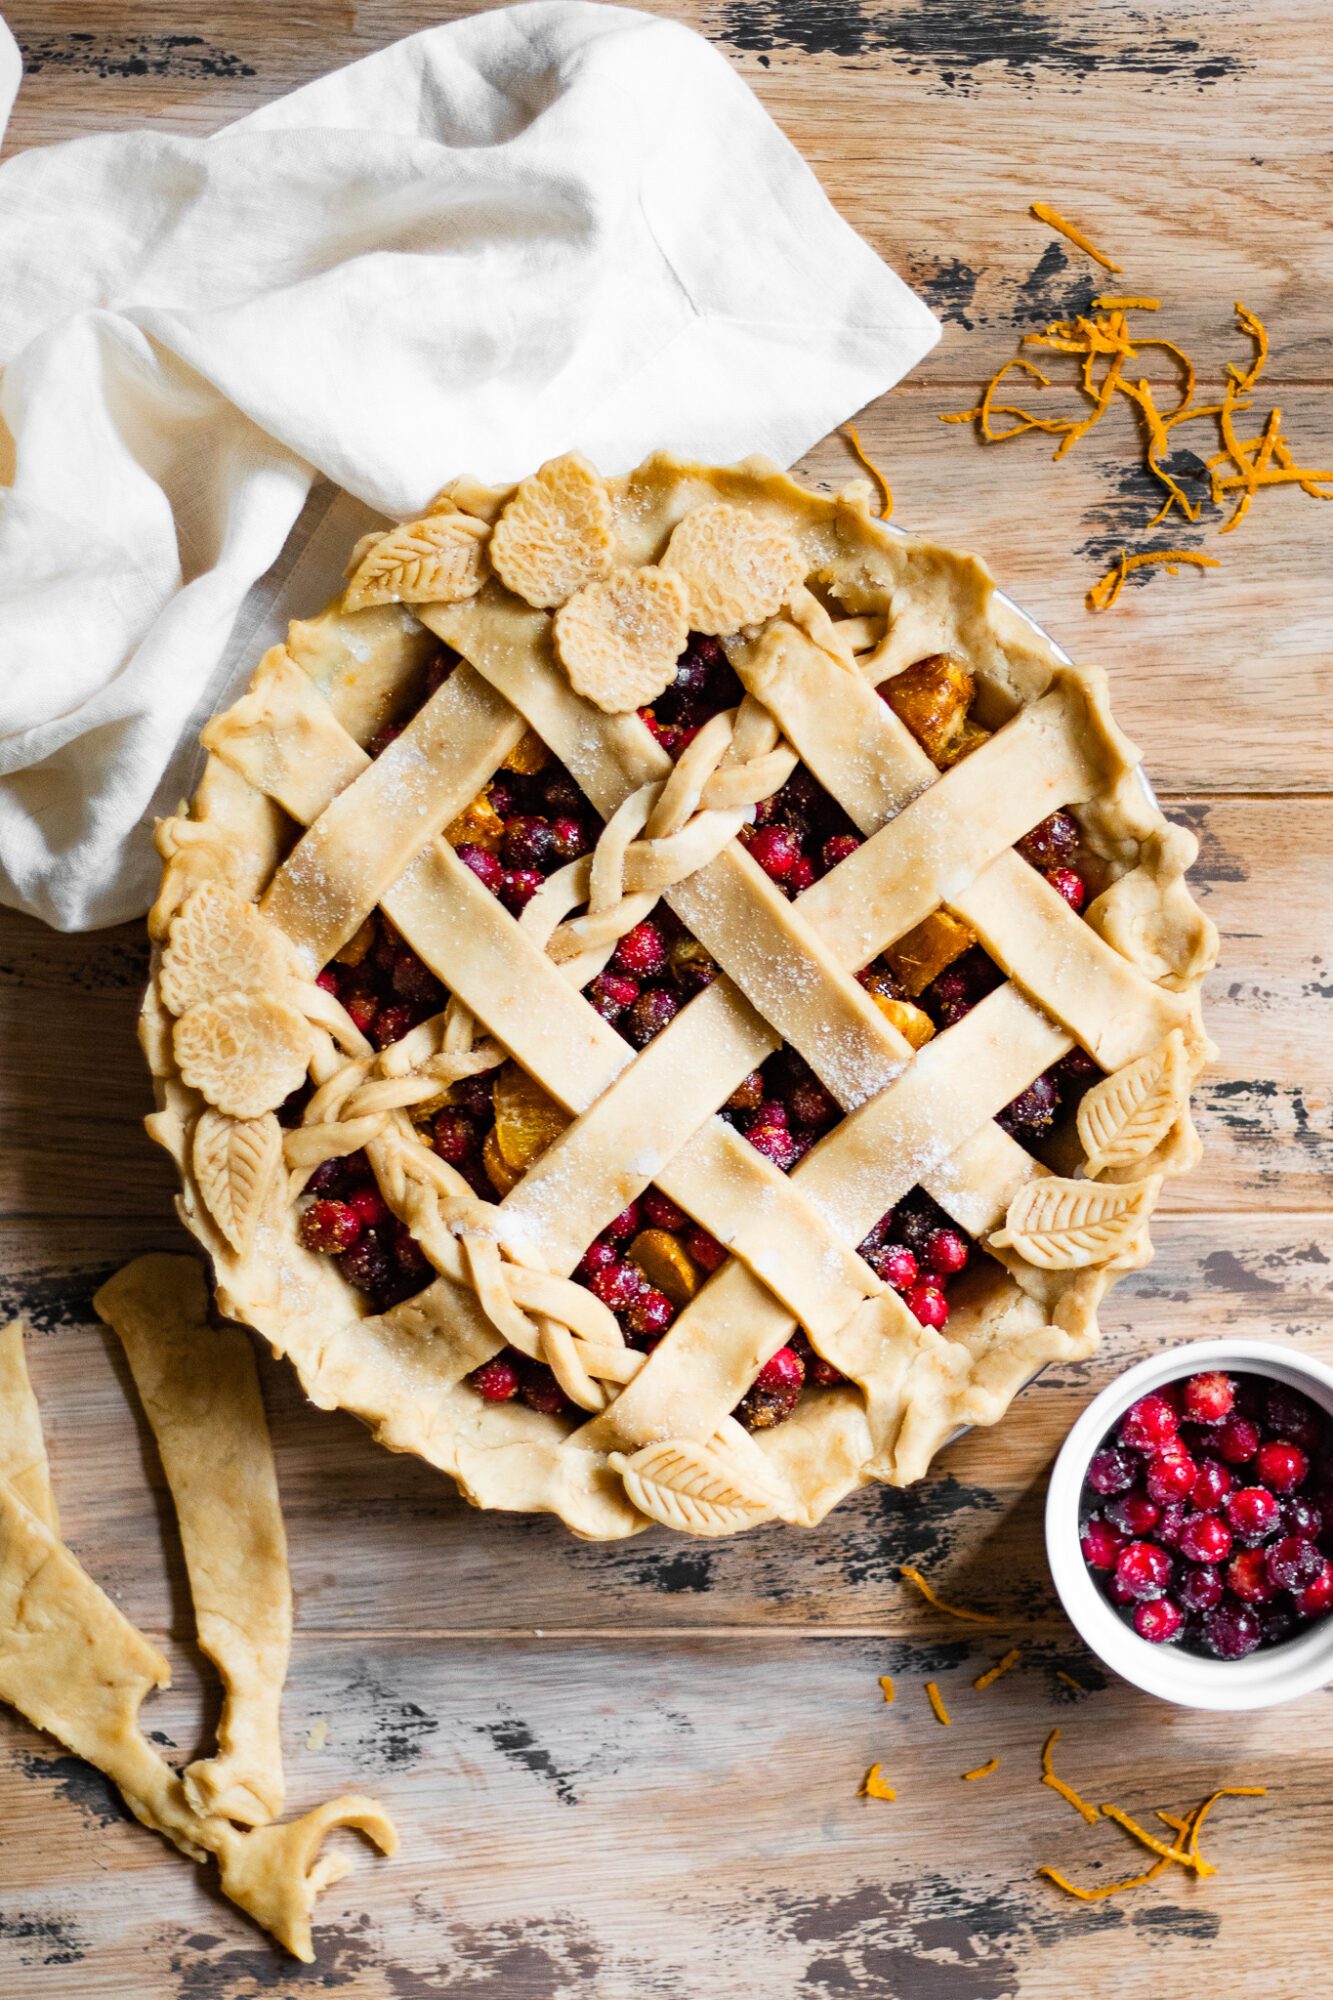
Now that your strips for your lattice crust are prepared, let’s get to making the lattice! For a basic lattice crust:
- Place 5 strips going one way over the pie dish. Don’t press them down, as you want to be able to lift them up as you weave the other 5 strips.
- Take your next strip (the 6th strip) and place it on the left most side of your pie dish.
- Gently fold back two of the strips to go over the 6th strip, making sure to go every other strip.
- Repeat by laying the 7th strip next to the 6th strip and using the opposite strips over the 7th (so this time, you’ll weave 3 strips over the 7th strip).
- Repeat this process, alternating strips, until you’ve reached the end.
- Then gently fold the edges of the pie in so that the lattice then becomes cemented. You can use your fingers to make ridges in the edges of the pie crust for a pretty design. If you have any leftover dough, like I did, you can also make festive cut outs to go over any not-so-pretty areas!
- Place your pie back into the fridge to chill for 30 minutes before baking.
And there you have it! That is how you make a lattice crust! I highly recommend watching the video, as that is the easiest visual to describe how you fold back each strips.
If you notice, I’ve also made some braided strips here too. That’s not necessary but definitely fun! All you’ll do there is slice one 1″ strip into 3 strips and braid like you would hair. Then use that strip to weave into your lattice.
Simple right? Now, let’s go over how to customize a pie crust to your needs!
Can I make this a gluten free pie crust?
Absolutely! I actually have a whole blog post on how to make a gluten-free vegan pie crust. It comes out just as flaky and beautiful as this one!

If your pie dough is crumbling:
This happens for a few reasons.
You could have used too much flour (which you should be able to tell during the dough making process if your dough isn’t coming together). Make sure to use a kitchen scale, as that will be most accurate. You can purchase a good $10 one on Amazon!
Otherwise, this can happen if you don’t have enough liquid or you didn’t mix the dough well enough. If your crust is crumbling when you’re rolling out, first start by adding a few tablespoons extra of chilled water. Give it a little kneading if possible and try again.
Your crust could also be too cold still and it’ll soften more as it warms up from being worked. If you haven’t mixed your ingredients well enough, throw that dough back into the bowl and give it a good knead! You might have to chill it again, but it’ll be worth it!

You are just going to absolutely love this easy vegan pie crust recipe! It’s the perfect pie crust for all of your baking needs, especially around the holidays. This pie crust helps to make the best pumpkin pie, pecan pie, or even apple pie!
As always, I love to see your creations personally, so be sure to tag me on Pinterest and Instagram so that I can see and share your lovely bakes!
Happy pie baking!
My favorite vegan pie recipes:
If you make this recipe, please be sure to leave a comment and a rating ⭐️⭐️⭐️⭐️⭐️ below. This helps others to find the recipes! As always, I absolutely love to see your beautiful creations on Instagram and Pinterest, so be sure to tag me there as well!
Watch how to make the best vegan pie crust!

Easy Flaky Vegan Pie Crust Recipe – “All Butter” Method
- Prep Time: 5
- Cook Time: 15
- Total Time: 20 minutes
- Yield: 1 pie crust 1x
- Category: Dessert
- Method: Baking
- Cuisine: American
- Diet: Vegan
Description
This undetectably vegan pie crust is SO flaky and “buttery,” and it’s super quick and easy to make in a food processor. We’re using a combination of vegan butter and avocado shortening that will give even a traditional pie crust a run for its money. Just 5 minutes of hands on work, and perfect for both sweet and savory pies!
Ingredients
- 2 1/2 cups (325 g) all purpose flour or gluten free 1:1 baking flour, plus more for rolling*
- 3/4 cup (180 g) salted vegan butter, chilled and cubed
- 3 tbsp (30 g) avocado shortening or coconut oil
- 1/4 tsp sea salt
- 1–2 tbsp sugar, optional
- 1/2 cup (111 mL) chilled water
Instructions
- Pulse: Add the flour and salt (as well as optional sugar if not using maple syrup) to a food processor, and pulse the ingredients together.
- Add in the vegan butter: Add in the avocado shortening and cubed vegan butter to the food processor, and pulse the ingredients until the mixture resembles a sand texture.
- Finish the dough: Place the lid back onto the food processor, and begin to blend again. Remove the top insert from the lid and carefully pour in the optional maple syrup (if you didn’t use sugar) and water, only adding 1 tbsp of water at a time until you reach a large smooth dough ball (see post pictures).
- Chill: Stop the food processor and remove the dough. Place the dough onto a piece of plastic wrap and form the dough into a flat disk. Wrap the dough in the plastic wrap and chill in the fridge for 30 minutes or even overnight if needed.
- Prep: When the pie crust is ready to be rolled, remove the dough from the fridge and allow it to rest for 15 minutes.
- Roll: Sprinkle a piece of parchment paper with flour, as well as the dough disk and a rolling pin. Gently roll the dough to be about 1/8″ thick and at least 1″ wider than the pie dish edge (see video). Gently drape the pie dough over the pie dish and gently press the dough into the sides of the pie dish.
- Par-bake: To parbake, place the dough back into the fridge and chill for at least 15 minutes while the oven is preheating to 375F. Make sure to poke holes into the crust and use pie weights. Bake the pie for 7-8 minutes to partially bake. Remove from the oven and fill with desired filling, following the directions from the filling recipe for the remainder of the baking.
- Tip: Use tinfoil and a pie crust shield to protect the crust from burning while baking. Enjoy!


Notes
Gluten free: Check out this gluten free vegan pie crust recipe post for all of the details on how to make this pie crust gluten free.
To make a lattice crust: you’ll need to double the pie crust recipe.
- Once you get to the first chilling section, separate the dough in half and cover in plastic wrap to chill in the fridge for an hour.
- To make a lattice, place the filling of the pie into the pie crust bottom and set aside (or in the fridge).
- Roll the second dough out to be a circle that measures about 12″ in diameter. To make the lattice, measure 1″ in width for each strip for the lattice, slicing 12 strips, depending on how many you want to go across each side. Drape half of the strips parallel to each other over the pie. Do not seal off the lattice yet. Then lift back the second, fourth, and sixth strip. Place a lattice strip that’s appareled across the strips. Place the second, fourth, and sixth strips back. Now pull back the first, third, and fifth strips. Place another lattice strip directly next to the last lattice strip, appareled across the first batch. Place the first, third, and fifth strips back. Repeat, alternating the groups of paralleled strips until you’ve achieved a woven lattice crust. Then continue onto Step 9.


Wow this guide is so helpful! Thank you!! I am all ready for Thanksgiving! Let’s do this 🙂
Aw enjoy!! I hope you love it!!
I am getting back into baking after years…. this time around, mainly gluten free. I have always loved baking, but suddenly just stopped because the gluten was too much and all baking traditional ingredients tend to be refined sugar, normal butter, refined flour, etc, things I can no longer have. I always thought it was so hard to bake gluten free, but its not. I have really loved getting back into baking with your website! I think like with everything, you need to study, practice, have patience and see how it turns out for you and make your modifications. I can’t wait to try and make pie crusts!
You recommend coconut oil in the video, but say you love vegan butter here… do have a preference? I want to make it with cassava flour. Thanks!
Hi Guilianna! You can use either- when I first made this crust, there wasn’t a great vegan butter that I liked, so I always used coconut oil (which also made is nut-free for the nut-allergy folks!). Now, I’ve found a few that I like- Miyoko’s (both the cashew version and the oat version) and Forager Project both work really well here. I personally love the vegan butter because it does give that “buttery” flavor to it without dairy. However, if you have a nut allergy go with the coconut oil, as the oat milk butter can be pricey. If you don’t like the coconut taste, go for refined coconut oil- it has zero coconut flavor to it, but acts a bit like shortening. I hope that helps!
I just made the pie crust, but it did not come together as a ball. In fact it feels very wet. I used GF flour and the lowest amount of water, thinking that if I need to add more I can. Wondering if I should add more flour? Or just refrigerate as is? Should it be very wet and more like cake batter?
Hi Cristin!! Oh shoot I’m so sorry! What was the GF flour? It needs to be a flour blend that’s made for 1:1 (like Bob’s Red Mill Gluten-Free Baking 1:1 Flour or King Arthur Flour Gluten-Free 1:1 Baking Flour). That way I can see what the issue is better!
I’m traveling for the holidays so I don’t want to take everything with me to make the crust. Could I make these pies on a Saturday and roll them out for the pie on a Wednesday? Will they be okay to stay refrigerated for that long? Excited to make my first pie using your recipe!
Hi Jasmine! Aw so happy you’ll be giving this a go! I would freeze the dough from Saturday to Wednesday, then give it about 2-3 hrs to thaw before rolling! That should do it!! So so excited to hear what you think! My only tip is if this is a pie for Thanksgiving, I test all of our Thanksgiving dessert recipes before making the final version, so if this is your first time making pie, it might be good to do a test crust first to make sure you know how your oven works if you’re partially or fully baking the crust (when I first made pie, I couldn’t figure out why my pie crust was slipping down the sides- now I know it’s because I was stretching the dough too much and not fully chilling it!). But you should be good to go and I know your pie is going to be WONDERFUL!
Can I take out the maple syrup? I wanted to make a sugar free dough.
Hi there! You can remove the maple syrup, you just might need more chilled water to achieve the dough texture!
Hello,
I’m planning to try this crust recipe. Which brand of cassava flour do you recommend? Thank you!
Hi Lisa! So excited to hear it!! I’ve used Bob’s Red Mill and Terrasoul for this pie crust- both work wonderfully!
Is there a sub for the arrowroot flour?
Hi Jenna! You can use cornstarch!
Can I freeze the pies? If so do I do that before I bake?
Hi Jenna! You can assemble the pie and freeze it entirely before baking! However, I’d place the pie in the fridge first for 10-15 minutes to make sure the dough is set and you don’t mess up your lattice crust design. Then remove it from the fridge, wrap it tightly, and store in the freezer until you’re ready to bake. Then you can transfer this pie straight from the freezer to the oven, but it will take longer to bake, so just keep that in mind! Alternatively, if you feel more comfortable leaving it out for 30 minutes at room temperature before baking, you can do that as well!
I’m hoping to use this recipe for thanksgiving, could I use a high powered blender if I don’t have a food processor to make the crust? Thanks!
Aw yay! I hope you do 🙂 Instead of a blender, I’d actually recommend using a pastry cutter and cutting the butter into the flour mixture- you’ll yield a better pie texture!
If I’m using cassava flour should I add arrowroot or omit this? Thanks!
Yes definitely include the arrowroot!
OK! thanks! If I’m using coconut oil, do you think this will turn out better with cassava flour or oat flour?
I really love coconut oil with the oat flour! I think it had a really nice flavor!
what size pie plate do you use…..8″ or 9″?
This crust will work with both, however with the 8″ you’ll have some leftover pie dough, for which you can use to make more pie designs/cut outs with!
You added baking soda in the video but it’s not in the recipe text. Please clarify how much baking soda.
Hi! The recipe card on the blog post is correct- the video is outdated, as the recipe has been updated since then. However, the method/gist of the recipe is the same. A new video will be coming soon!
Hi!
Salted vegan butter or Unsalted?
Thank you!
You can use salted! However, if you only have unsalted (I love miyokos!), you can add 1/8 tsp of sea salt to the flour mixture!
Hello! 🙂
I just made this this afternoon. It’s in the oven right now! Can’t wait. I have some leftover dough. Can I freeze it? And if so, how long? Or shall I keep in the fridge for up to a week maybe?
Thank you. xx
With love,
Lara
Hi Lara! I just saw your comment over on the apple pie recipe page, but yes you can freeze it, for up to 3 months! 🙂 Enjoy!!
Hello, I doubled this recipe and used my kitchen scale, however when I got to the food processing, my dough was very soft (not sand like) and it felt like adding water would’ve turned it to soup. Any thoughts? Its chilling in the fridge but unsure if skipping the chilled water is going to impact how it cooks. It did feel like 360g of butter was a lot…
I also noticed higher in your post you mention adding arrowroot powder however its not on the recipe card? Thanks,
Hi Alaina! Hmm I’m so sorry to hear this didn’t work out, it definitely shouldn’t have been soup…are you using a different flour?
In the video you said to add baking soda to the food processor and in the recipe card or in the description it isn’t mentioned at all, perhaps there’s been a mistake?
Hi Noa! So sorry, that was an old video! I haven’t had a chance to update it, so I’m so sorry for the confusion- the written recipe is most up to date!
I see comments mentioning arrowroot powder, but I don’t see it mentioned anywhere in the recipe. So that’s why it was so wet. Is it too late to add if the dough is already chilling? And how much?
So sorry for the confusion! It used to use arrowroot, but if your dough was too wet, you added too much water while making it. It should still chill fine however!
Do I need to use avocado shortening for this recipe? I would prefer to use it without nor any substitutes but if it’s mandatory to use, is there a substitute?
You can use coconut oil instead- I personally like the avocado shortening for the neutral flavor, but either will work!
I don’t see avocado shortening near me or online so I plan to try this with coconut oil. Should I use refined or unrefined?
Hi Sam! Try using refined coconut oil. Just make sure it is CHILLED!!