

Easy Flaky “Buttery” Vegan Pie Crust Recipe
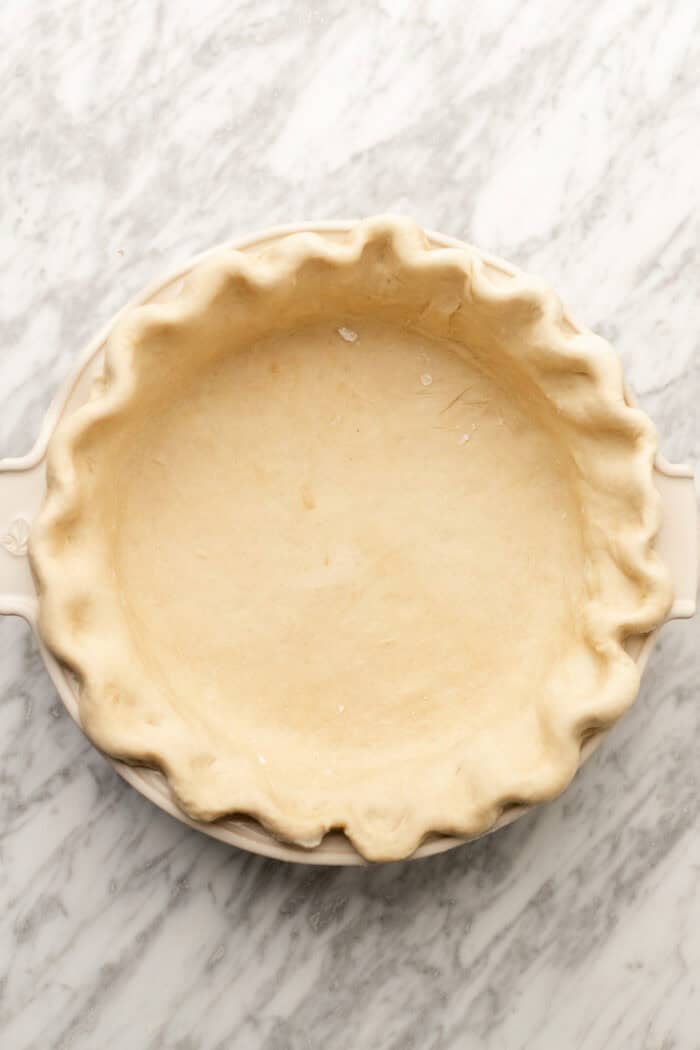
This ridiculously easy vegan pie crust is incredibly buttery, flaky, and tender, all without any eggs and dairy! We’re using a combination of vegan butter with vegan shortening and just 5 minutes of hands on work for either two single crusted pies or one double crust. Easily frozen for make ahead, this is the recipe that made me fall in love with pie making (when I used to hate it!), and it’s the exact recipe I use for my fan favorite vegan pumpkin pie, vegan apple pie, vegan chocolate pecan pie, and more classic vegan holiday pies, both sweet and savory!
Quick Look: Vegan Pie Crust
- Method: Homemade pie dough by hand; chilled and rolled before baking for either par-bake or fully baked
- Why Make THIS Version? Beautifully flaky, tender, “buttery” crust all without eggs and dairy- perfect for sweet or savory!
- Secret to Success: Keep fats chilled and use cold water when making the dough
- Key Ingredients: All-purpose flour, vegan butter, avocado shortening, water, salt
- Yield: 2 pie crusts for either 2 pies or 1 double-crusted or lattice pie
- Best for: Vegan pumpkin pie, vegan pecan pie, vegan quiche, vegan apple pie
- Freezer-Friendly: Yes. Freeze your unbaked dough for up to 3 months
Table of contents
Why this vegan pie crust recipe works:
You’re going to truly be obsessed with this vegan pie crust recipe. It tastes just like a classic pie crust with a beautifully flaky “buttery” texture, and the look is so professional, you’d think the pie was purchased in store.
This is the pie crust recipe that I use for my vegan pumpkin pie, sweet potato pie, vegan brownie pie, and even vegan apple pie when I want a lattice crust!
Here’s why it works:
- We’re using a combination of vegan butter and avocado shortening to create extra flakiness. I’ve spent years testing this crust with just vegan butter to just coconut oil or shortening, and finally have the perfect recipe. In my testing, using a combination of vegan butter for both richness and flavor and avocado shortening for flakiness without compromising flavor provides the ultimate vegan pie crust!
- You only need your hands. The pie dough comes together much like a traditional pie dough would. You rub the chilled fats into the flour and knead in the flour to create a thick dough with specks of butter and shortening throughout. This creates the extra flaky layers!
- Perfect for both sweet and savory pies. There is the optional addition of some granulated sugar to the pie crust for sweet pies, like my vegan chocolate pecan pie. Or you can use it in a more savory pies.
Simple Ingredients
To start, you’ll need a few ingredients. If you have different dietary needs and preferences, we’ll go over those in the later sections. Let’s get to the basics first of how to make pie dough by hand:
- All-Purpose Flour: I recommend using all-purpose flour here for its protein content. Bread flour will make this pie dough way too tough. I also have options for gluten free. But I highly recommend checking out either my full gluten free pie crust recipe post or my oat flour pie crust recipe for a gluten free vegan pie crust!
- Vegan butter: I personally recommend using Country Crock’s plant butter sticks here for the best option. I have my own vegan butter recipe (not able to share it until 2027 so stay tuned!!) that works beautifully here. But for now, store bought works great too (I’ve tested this!).
- Sugar: This is mainly for sweet recipes to just complement the sweet pie!
- Avocado shortening: If you don’t have access to this, you can use more vegan butter, but the shortening will help achieve a super flaky crust, as it’s all fat (and no liquid/water content).
- Chilled water: It’s crucial not to use too much or too little. I’ve given precise measurements here so there should be no worries, but if you’re using US cups, it may be a bit tricky. Stick with the 3/4 cup measurement and if you really need to add more, then use 1 tablespoon at a time in between mixing.
- Salt: I use sea salt here. Just a bit helps to balance the flavors!
How to make the BEST vegan pie crust:
Making the pie dough:
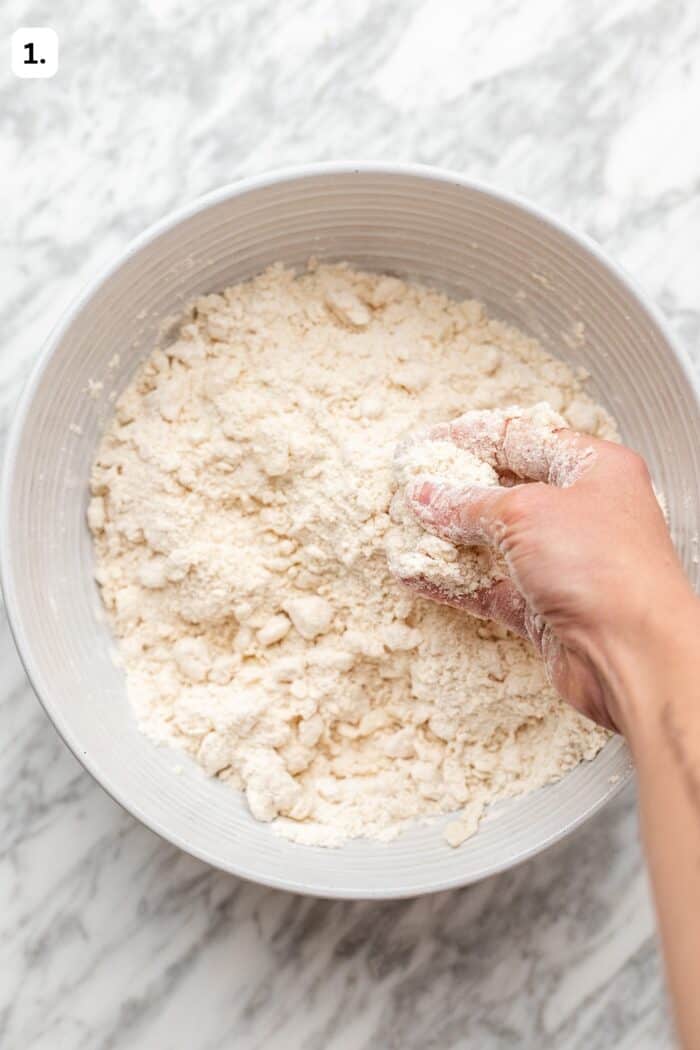
Step 1: First up, we rub the fats into the flour mixture. I whisk together the flour, sugar, and salt, then use clean hands to rub the butter and shortening into the flour mixture to resemble a sandy texture with pea-sized clumps of fat coated in flour. This will create the flakiness in our pie crust!
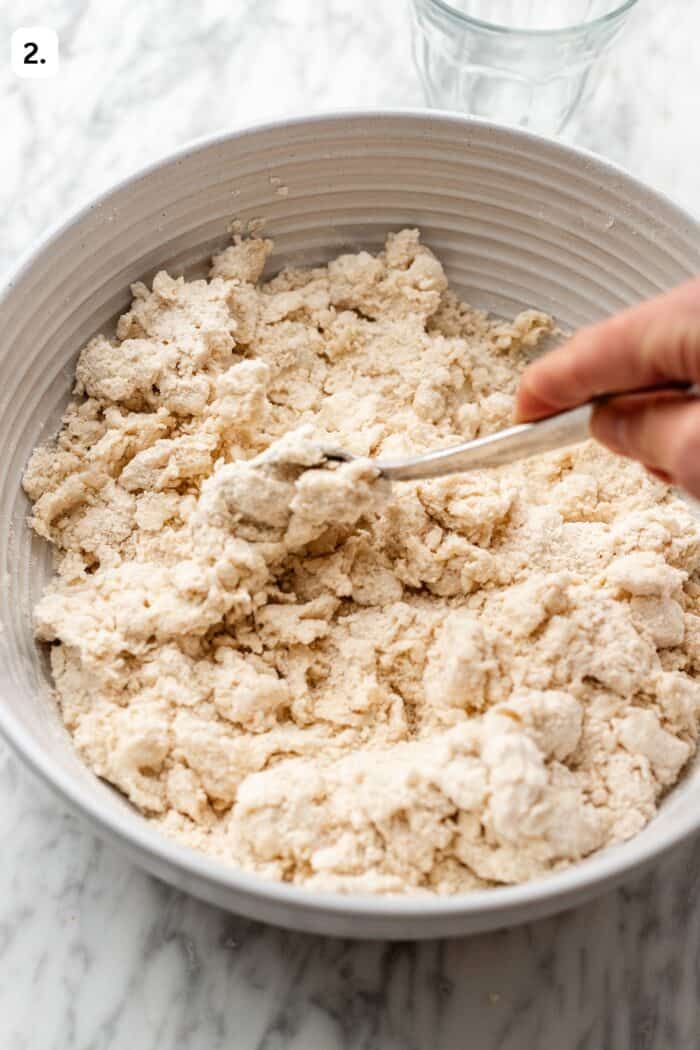
Step 2: Then add in the chilled water and mix to help the flour absorb into the flour mixture.
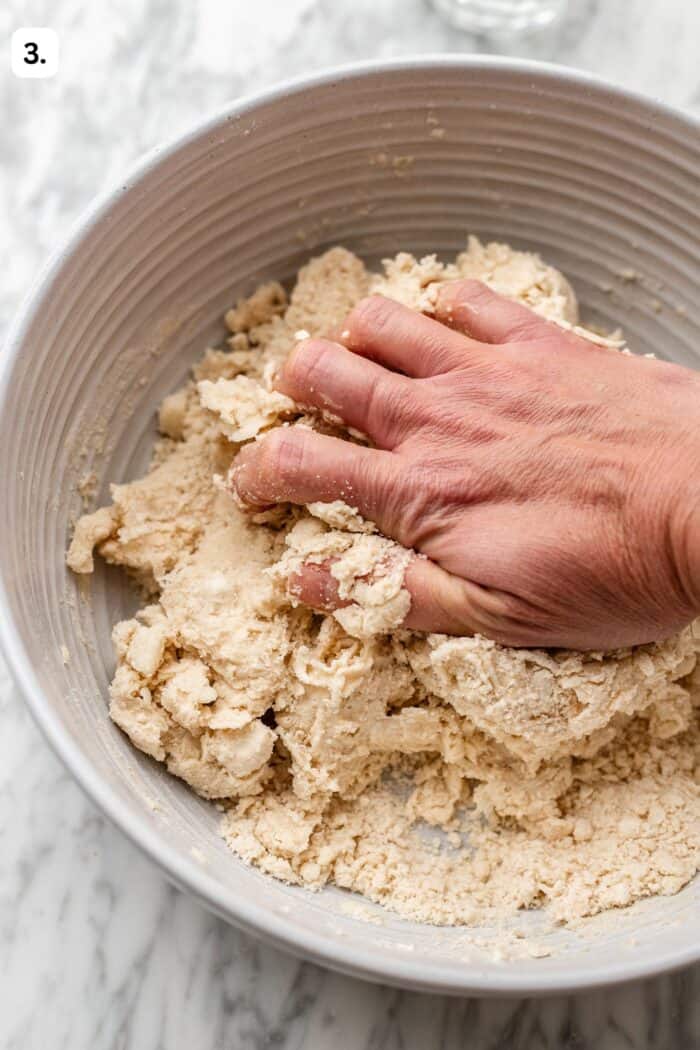
Step 3: Next up, switch back to your hands to mix and gently knead the dough into a shaggy dough ball. Don’t over-work the dough- just mix enough to form a shaggy ball.
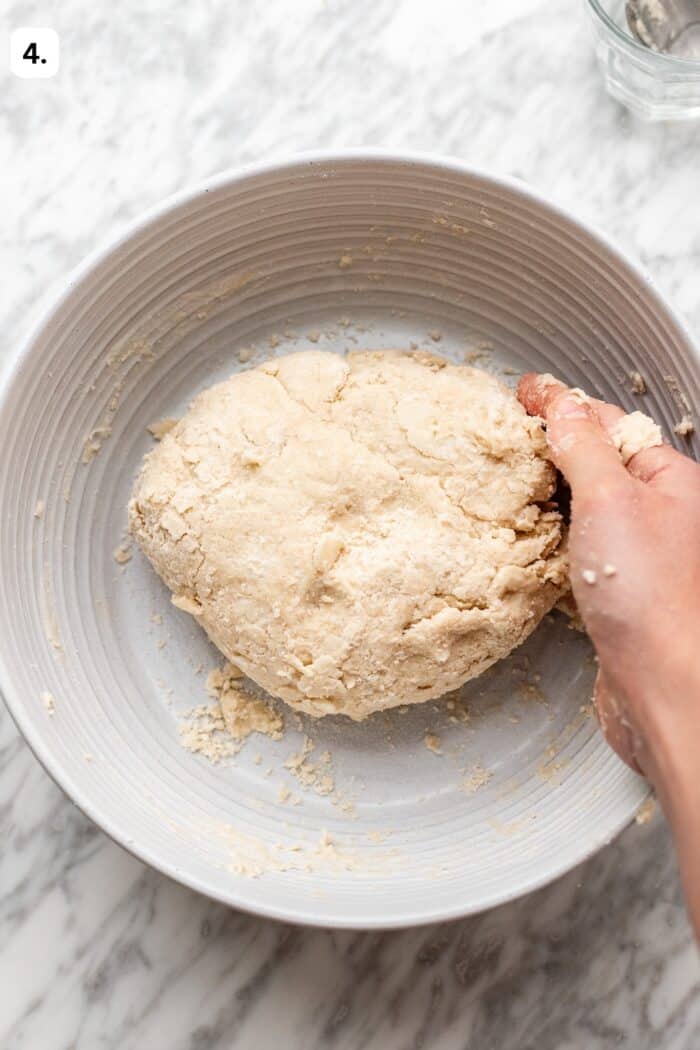
Step 4: Once you’ve formed the dough ball, you can divide it in half for 2 single pie crusts.
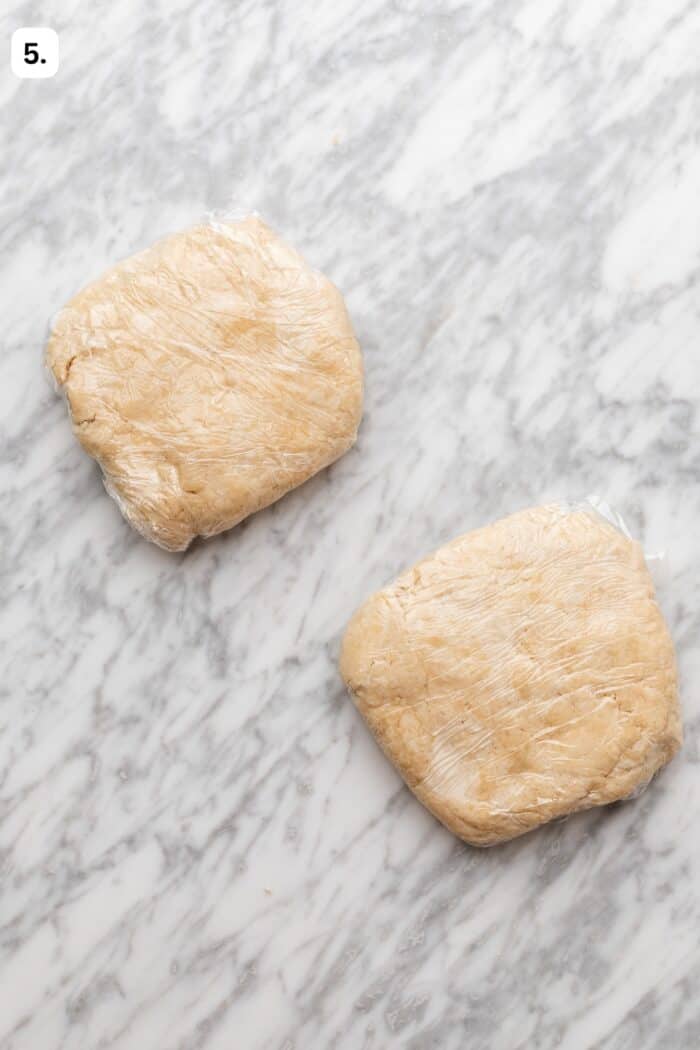
Step 5: Wrap each dough half in plastic wrap and form into a disc shape. Chill in the fridge for at least 2 hours or overnight.
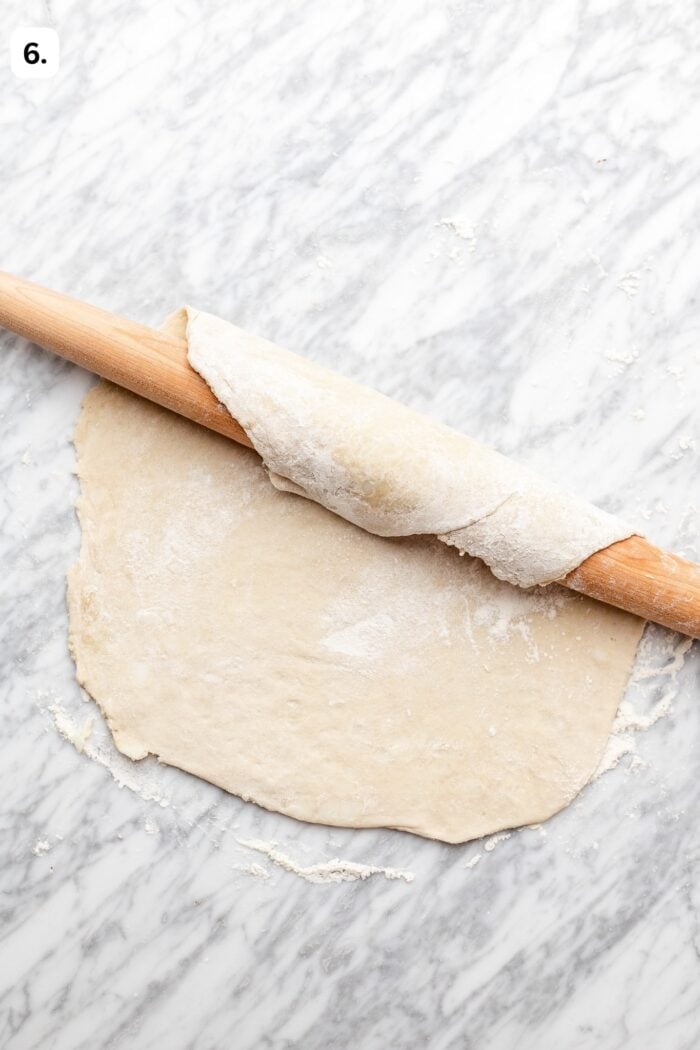
Step 6: When ready to shape, remove one disc from the fridge and roll out to be about 12-14″ in diameter. This pie dough will work great for a 9-10″ pie dish! You want to have at least 2 inches wider on either side of the pie dish.
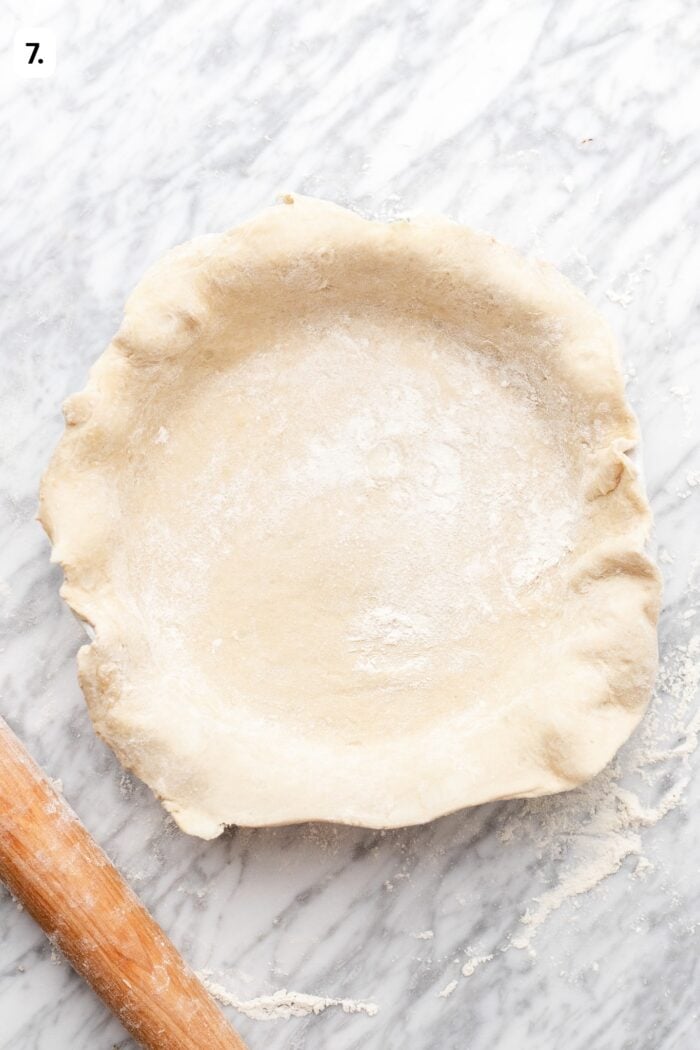
Step 7: Carefully transfer the pie dough to the pie dish. I use a rolling pin and gently roll the dough onto the rolling pin and unrolling into the middle of the dish. The key is to shimmy the dough down into the bottom of the dish so that the dough rests upon the pie dish rather than stretches. This prevents sinking of the pie dough when it bakes!
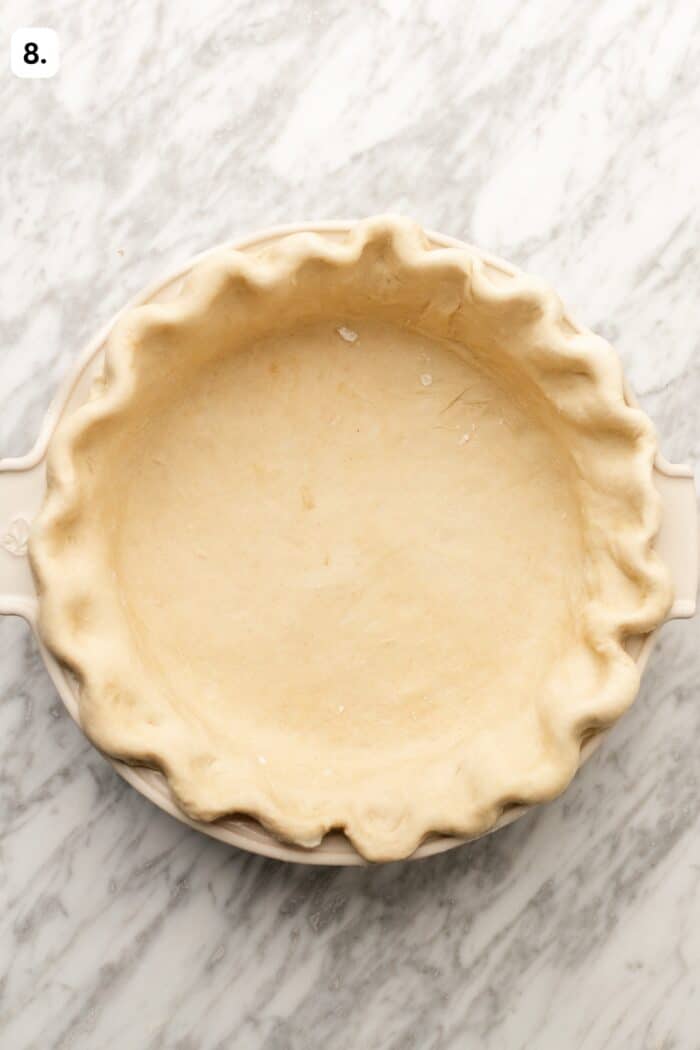
Step 8: Fold under the overhanging trim and use your thumb on one hand and the forefinger and middle knuckles on the other hand to press the dough to crimp it. Then I like to chill the shaped pie crust in the freezer for 30 minutes before par-baking!
Par Baking vs. Blind Baking
Blind baking a pie crust is really dependent on the recipe. For instance, a no bake pie filling will require a fully baked pie crust first. A fruit pie, on the other hand, might require a partially baked, or par-baked, pie crust to ensure that a soggy bottom doesn’t happen.
Par baking a pie crust means that we’re partially baking the crust and then fully baking it with our desired filling in the middle.
Either way, I start by:
- Placing a piece of parchment paper into the middle of the pie crust, and filling it with either flour, uncooked rice, or uncooked beans (I prefer flour, because then you get heat-treated flour, perfect for edible vegan cookie dough!).
- Brush the edges with our homemade vegan egg wash of maple syrup and soy milk.
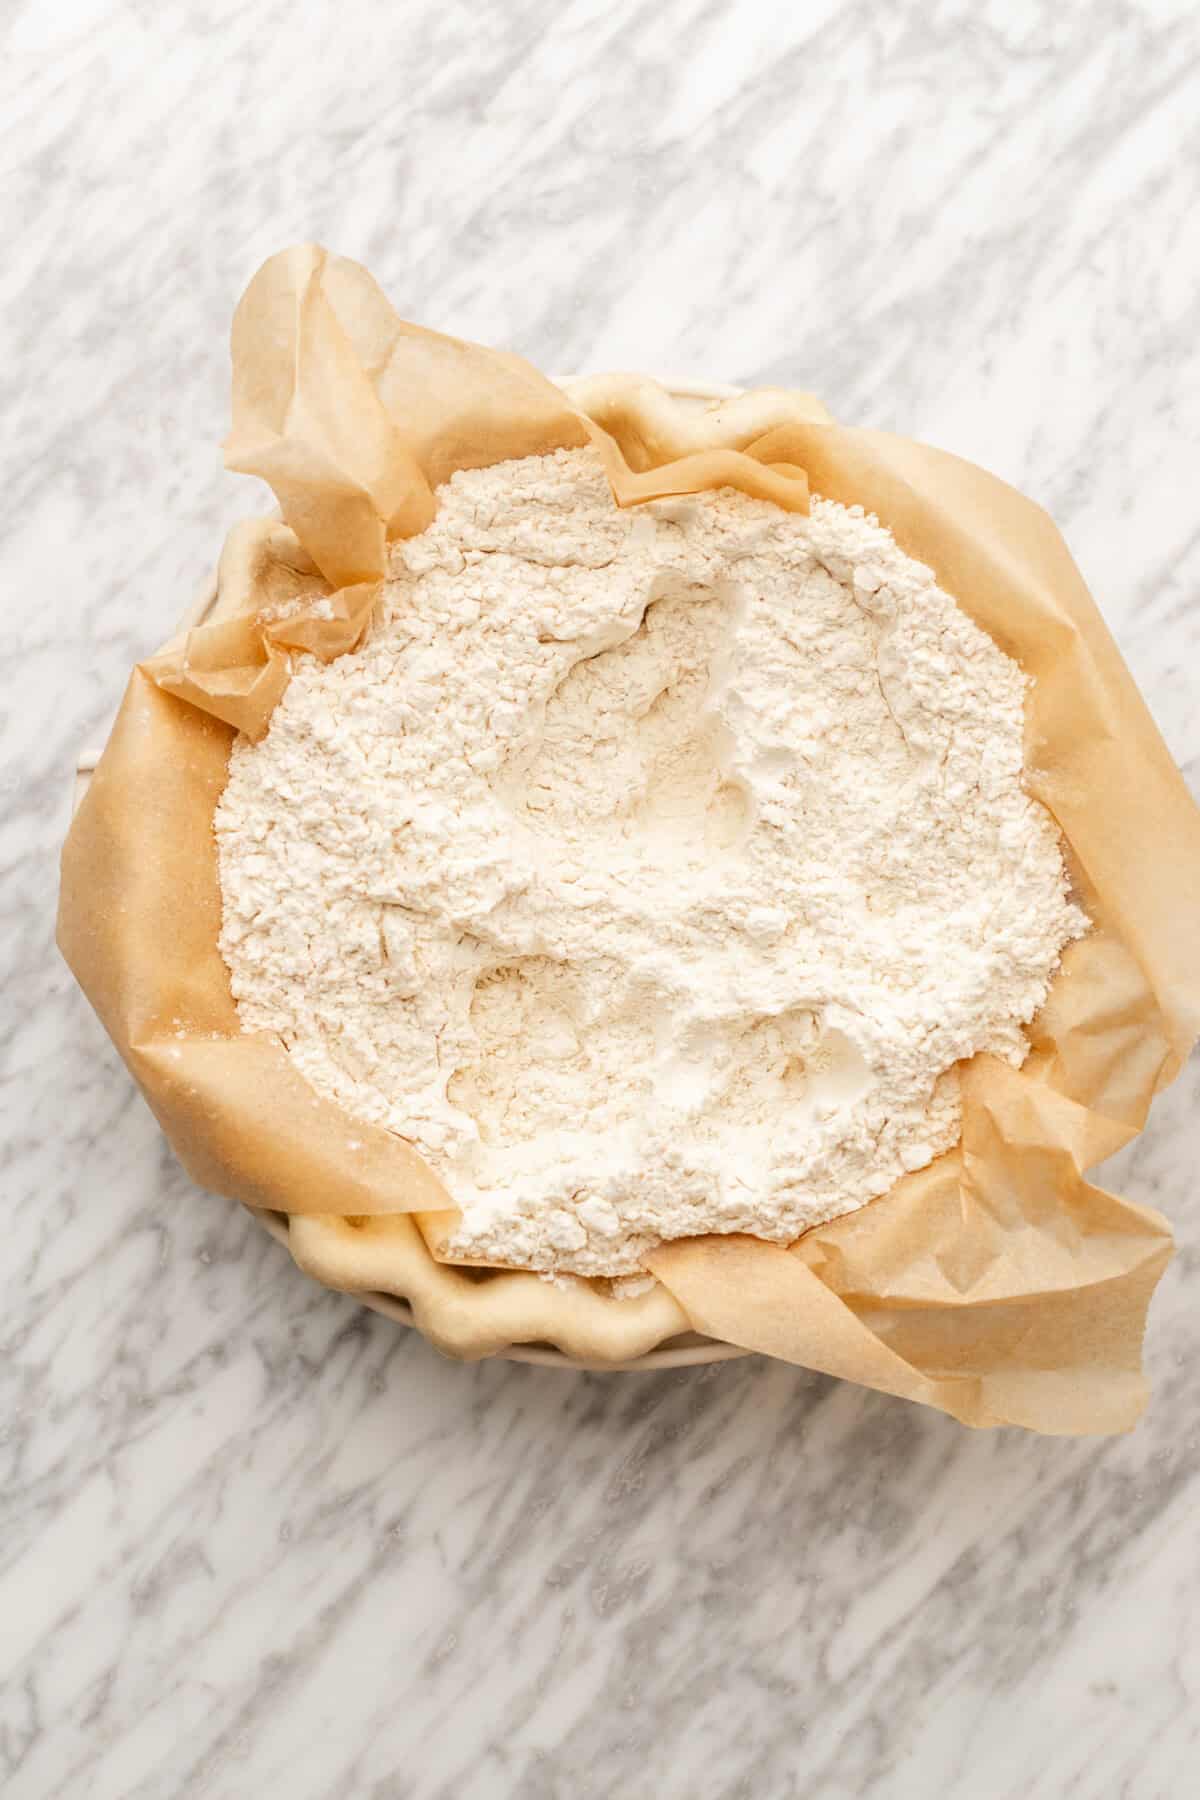
Once filled, we’ll:
- Bake for 15 minutes at 400F. Then remove the pie from the oven.
- Remove the pie weights and brush with a little more vegan egg wash. Then place the pie crust back into the oven to continue baking for an additional 10 minutes.
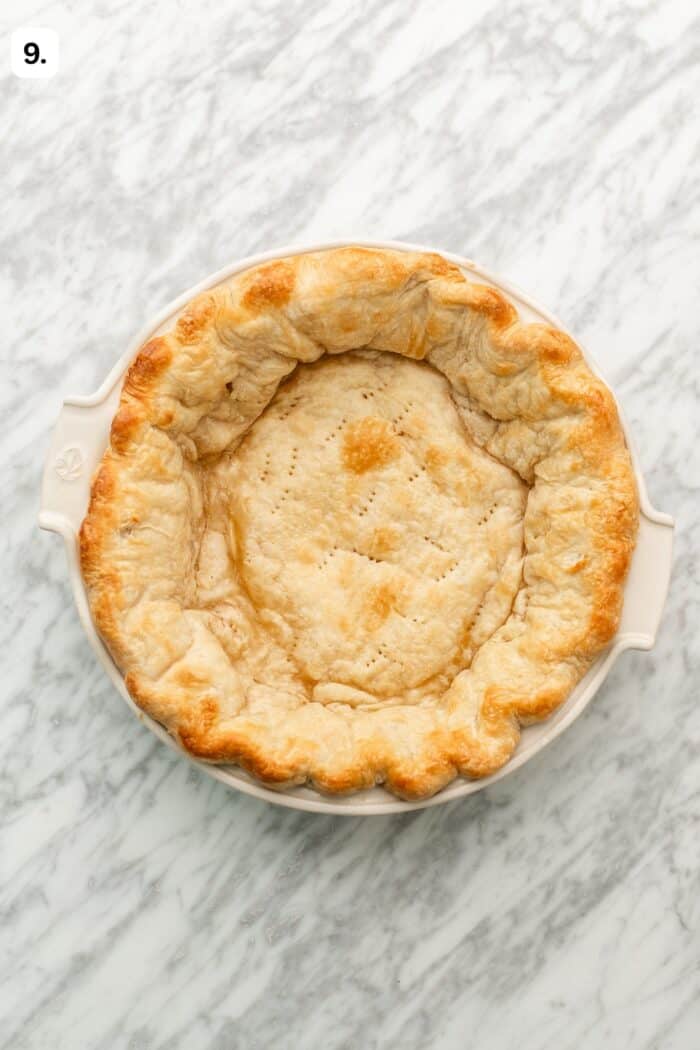
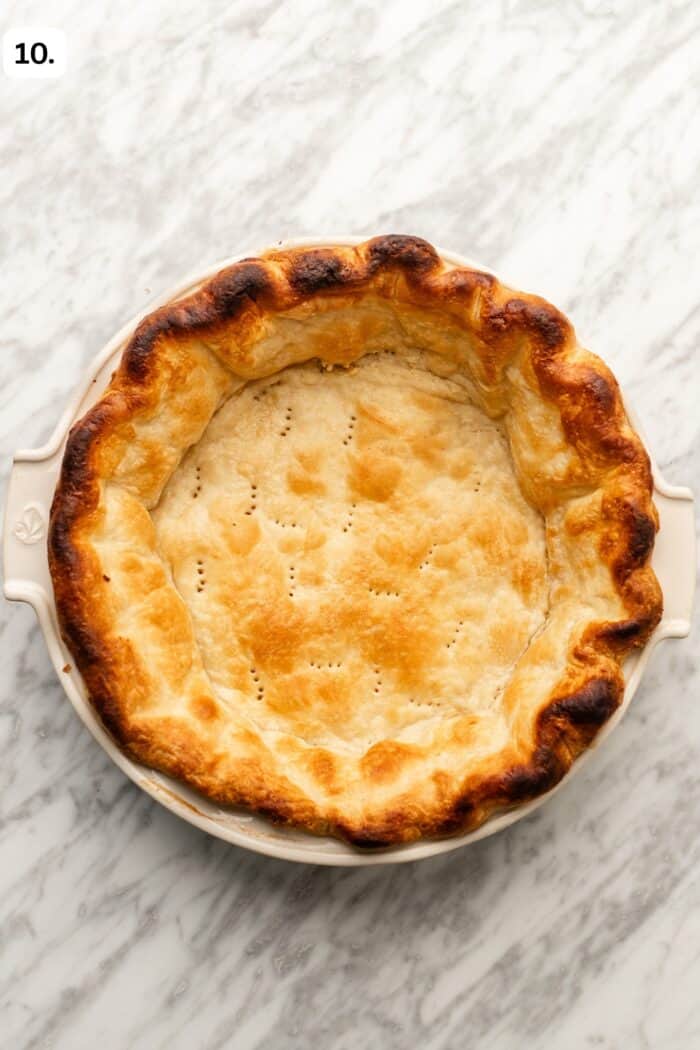
Now our crust is partially baked. To fully bake or blind bake the crust, like for my vegan banana cream pie, continue baking for an additional 20 minutes after you’ve removed the pie weights when you place the pie crust back in for a second round of baking.
How to make a lattice
Many pies that require a lattice crust don’t have you blind bake the crust beforehand (at least none that I’ve ever made, and I like making pies!), so if you’ve just finished making the bottom of your pie, let that crust rest, add the filling, and then get to making your lattice crust:
- Roll the second dough out like you did the first time, making sure to roll it wide enough for the dimensions you need. I used a 10″ pie dish, so I needed the strips to be 10″ long, and since I made each strip 1″ wide and used 10 strips, I measured 12″ in length at the minimum (for safe measure 😉 ).
- Measure each strip to be 1″ and make little dashes to keep your place.
- Use a ruler while slicing each strip. You should have 10 10″ by 1″ strips.
Now that your strips for your lattice crust are prepared, let’s get to making the lattice! For a basic lattice crust:
- Place 5 strips going one way over the pie dish. Don’t press them down, as you want to be able to lift them up as you weave the other 5 strips.
- Take your next strip (the 6th strip) and place it on the left most side of your pie dish.
- Gently fold back two of the strips to go over the 6th strip, making sure to go every other strip.
- Repeat by laying the 7th strip next to the 6th strip and using the opposite strips over the 7th (so this time, you’ll weave 3 strips over the 7th strip).
- Repeat this process, alternating strips, until you’ve reached the end.
- Then gently fold the edges of the pie in so that the lattice then becomes cemented. You can use your fingers to make ridges in the edges of the pie crust for a pretty design. If you have any leftover dough, like I did, you can also make festive cut outs to go over any not-so-pretty areas!
- Place your pie back into the fridge to chill for 30 minutes before baking.
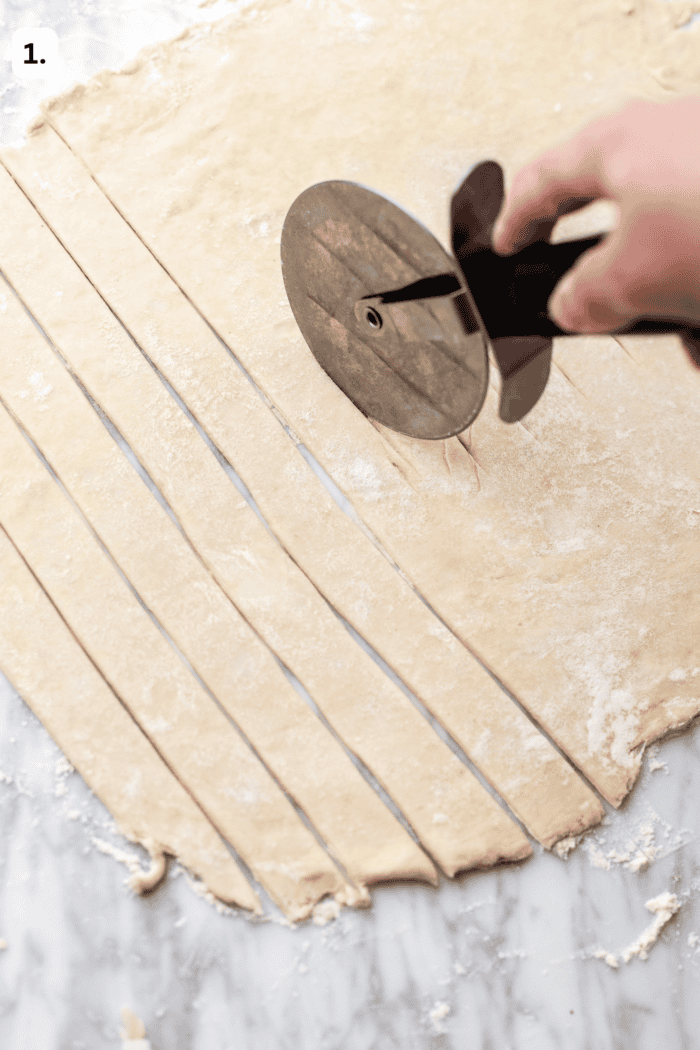
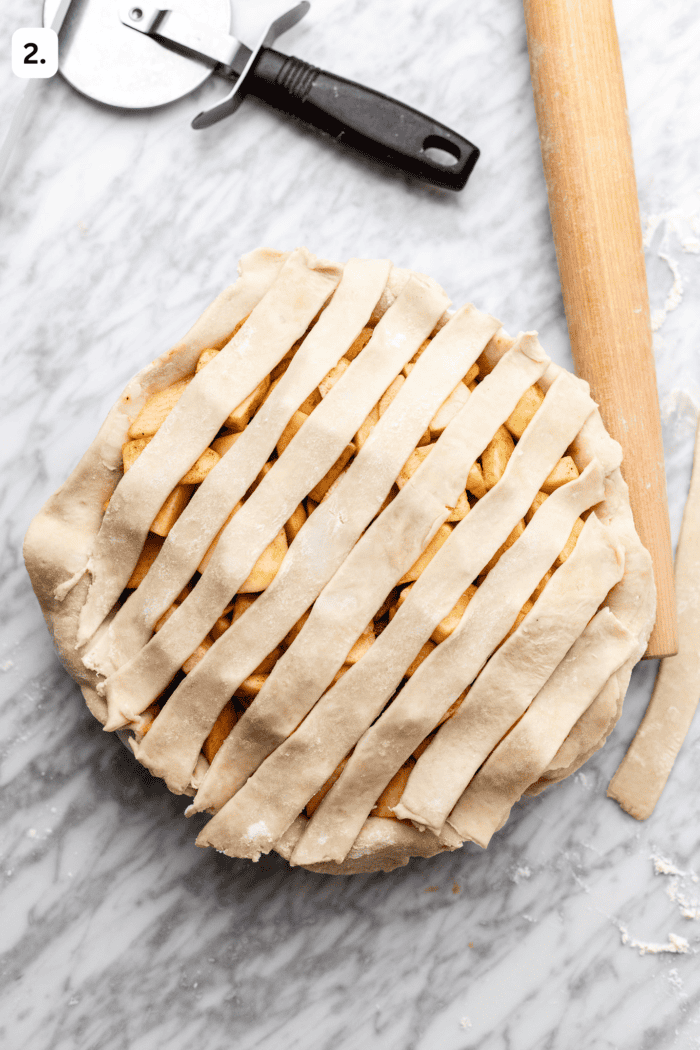
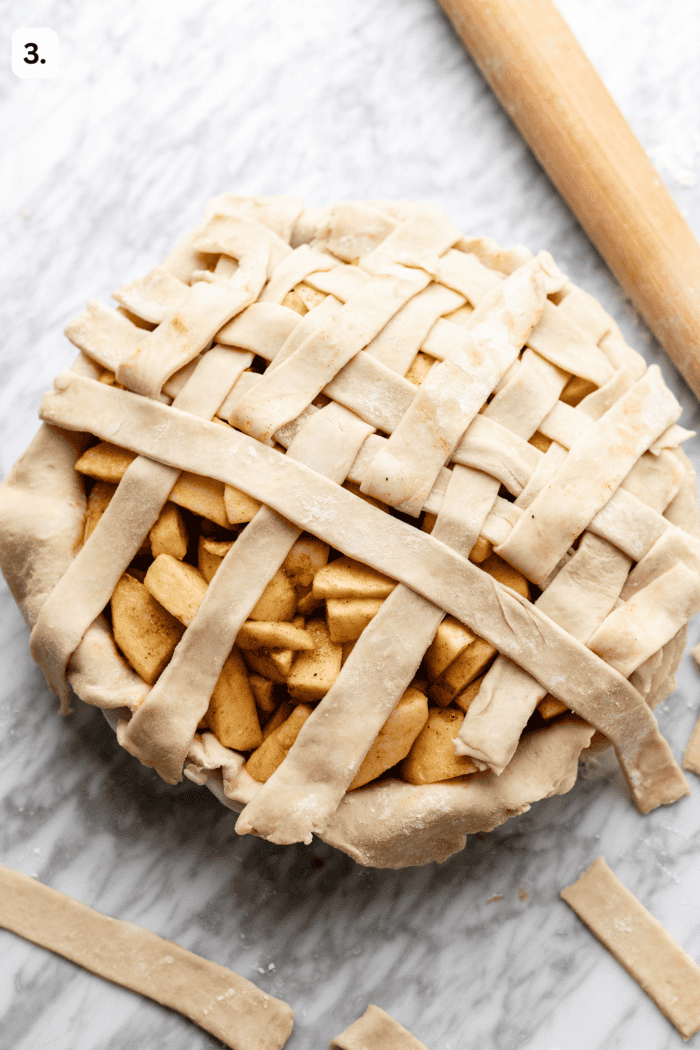
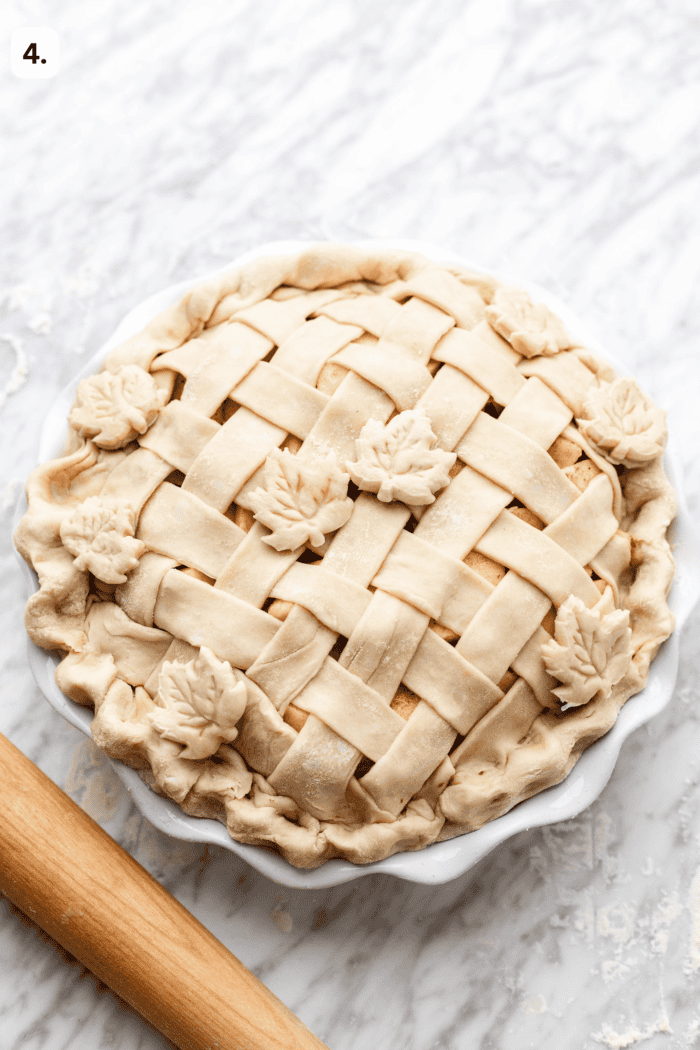
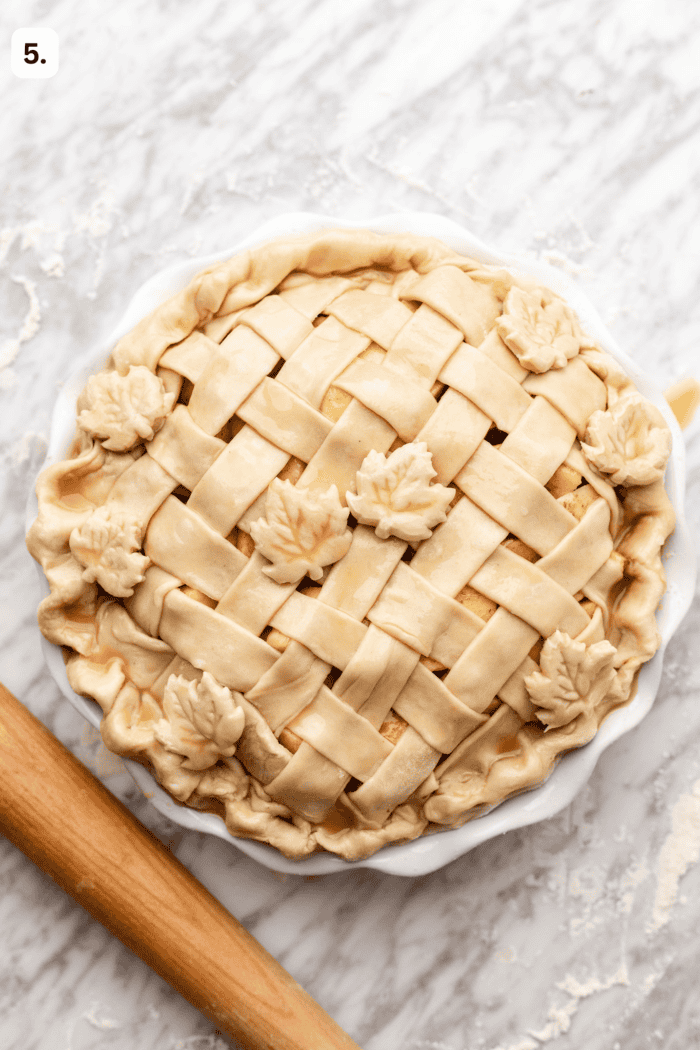
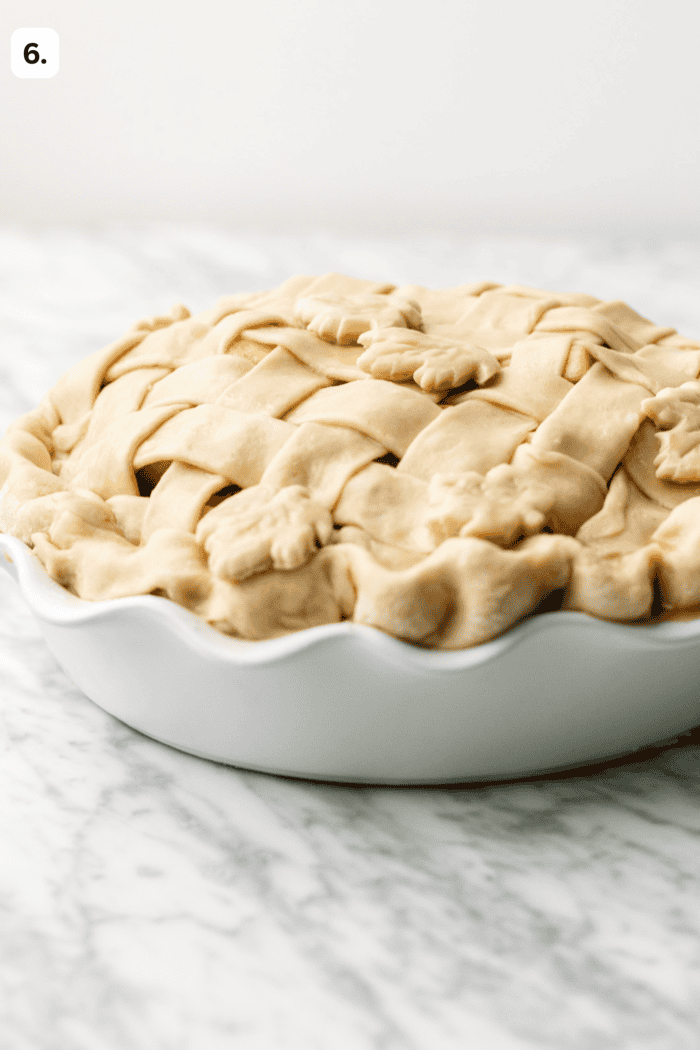
And there you have it! That is how you make a lattice crust! I highly recommend watching the video, as that is the easiest visual to describe how you fold back each strips.
If you notice, I’ve also made some braided strips here too. That’s not necessary but definitely fun! All you’ll do there is slice one 1″ strip into 3 strips and braid like you would hair. Then use that strip to weave into your lattice.
Pie Troubleshooting:
If your dough is crumbling: This is likely from too much flour or not enough water. Adding a tablespoon or two of chilled water to the dough can help fix this if you’ve spent time kneading the dough into a sort of shaggy dough and it’s still not coming together.
If your dough is too wet: This can happen if you’ve added too much liquid. I really recommend using metric measurements here to avoid this, but you can start by adding a tablespoon or two of flour at a time until it resembles a shaggy dough and not wet dough.
If your crust is shrinking while baking: This happens if you’ve over-stretched the dough without letting it rest. It’s crucial that every time you roll, you pick up the dough so you know it’s not stretched out! Also be sure that when you’re placing the dough into the pie dish, make sure you’re not stretching the dough but gently resting it along the sides of the pie dish.
My pie crust bottom is soggy! This can happen if you haven’t partially baked the pie crust long enough! I recommend really letting it bake an additional 10 minutes in the oven after using pie weights to solve this issue. It can also occur with some fruit pies.
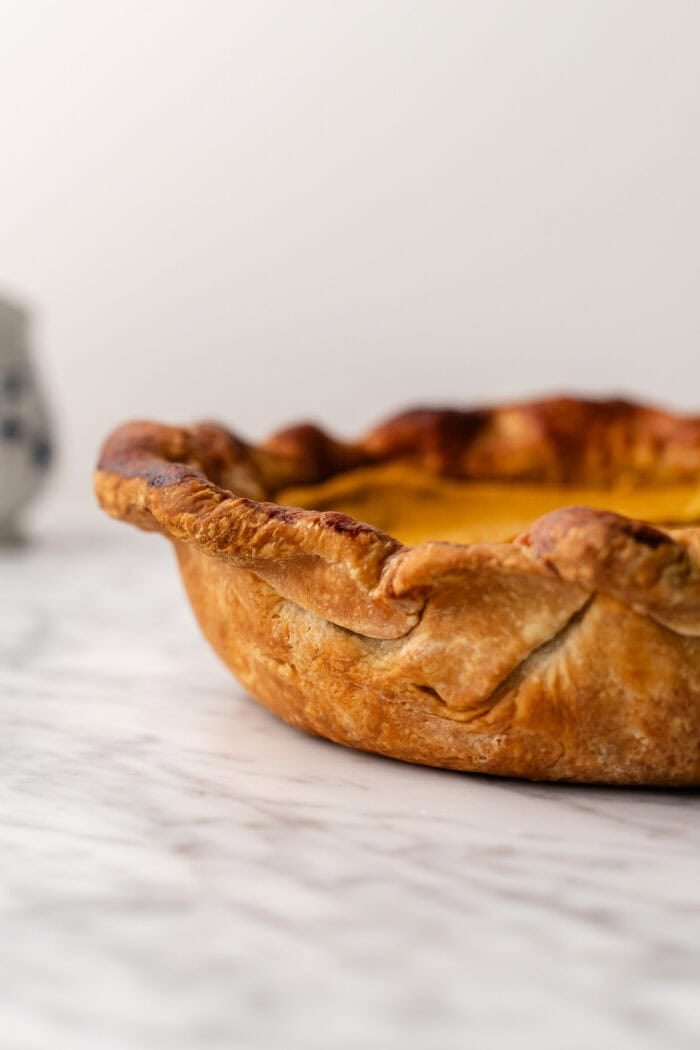
My edges are browning too quickly: If you don’t have a pie shield, you can tent just the pie crust part with tin foil. Try not to tent the entire pie crust unless the recipe you’re using for the full pie says this is okay. This is because it traps air underneath the parchment paper and messes with how the filling is baked (see my poor pumpkin pie here haha!).
Vegan Pie Crust FAQ:
I used to use a food processor when making my pie dough, but honestly? The flakiest results are when you use the hand-made version. You can definitely use a food processor, but expect the flakiest results to be by hand!
Absolutely! This vegan pie crust recipe is able to be frozen at any stage- during the initial dough phase, the shaped pie dough phase, or even the fully baked phase.
Yes definitely. You can use gluten-free all-purpose flour that is 1:1 (I like King Arthur Measure for Measure here). But you can also check out my gluten-free vegan pie crust and my oat flour pie crust recipes!
I recommend using both, as it will yield the flakiest results!
My favorite vegan pie recipes:
🌟MADE THIS RECIPE & LOVED IT?🌟Leave a comment and a rating ⭐️⭐️⭐️⭐️⭐️ below! This helps others to find the recipes! As always, I absolutely love to see your beautiful creations on Instagram and Pinterest, so be sure to tag me there as well!
Print
Easy Flaky “Buttery” Vegan Pie Crust Recipe
- Prep Time: 20
- Chilling times: 2 hours or overnight
- Cook Time: 27
- Total Time: 0 hours
- Yield: 2 pie crusts or 1 double crust 1x
- Category: Dessert
- Method: Baking
- Cuisine: American
- Diet: Vegan
Description
This ridiculously easy vegan pie crust is incredibly buttery, flaky, and tender, all without any eggs and dairy! We’re using a combination of vegan butter with vegan shortening and just 5 minutes of hands on work for either two single crusted pies or one double crust. Easily frozen for make ahead, this is the recipe that made me fall in love with pie making (when I used to hate it!). This is your go-to pie crust recipe from now on!
Ingredients
Pie dough:
- 4 cups (500 g) all purpose flour or gluten free 1:1 baking flour, plus more for rolling*
- 1 cup (226 g) salted vegan butter, chilled and cubed
- 1/2 cup (113 g) avocado shortening, chilled and cubed
- 2 tbsp sugar, optional
- 1/4 tsp sea salt
- 3/4 cup (171 mL) chilled water
Vegan Egg Wash:
- 1 tbsp soy milk
- 1 tbsp maple syrup
Instructions
- Rub the fat into the flour: Add the flour and salt (as well as optional sugar if making a sweet pie) to a large bowl. Using clean hands, add in the cubed vegan butter and avocado shortening to the flour, and rub the fats into the flour to create a sandy texture in the flour with pea-sized clumps of fats in the flour.
- Finish the dough: Pour in the cold water and at first, use a silicone spatula to begin mixing the water into the flour mixture. Once it’s been mostly integrated into the dough, you can switch back to your hands to gently knead and mix the mixture into a shaggy dough.
- Chill: Cut out two large pieces of plastic wrap. Divide the dough in half and place one dough half onto a piece of plastic wrap and form the dough into a flat disk. Wrap the dough in the plastic wrap and repeat for the remaining half of the dough. Place both into the fridge to chill for at least 2 hours or overnight if needed.
- Prep: When the pie crust is ready to be rolled, remove one dough half from the fridge.
- Roll: Sprinkle a clean working surface with flour, as well as the dough disk and a rolling pin. Gently roll the dough to be about 1/8″ thick and at least 2″ wider than the pie dish edge. Gently drape the pie dough over the pie dish and gently press the dough into the sides of the pie dish. This is to prevent the pie dough from stretching over the pie dish and sinking while baking. Tuck any over hanging edges and crimp the dough with your thumb and forefingers.
- Par-bake: To par-bake, place the dough into the freezer to chill for at least 15 minutes while the oven is preheating to 400F. Once preheated, remove the pie from the freezer. Place a piece of parchment paper into the middle of the pie crust and pour either 3-4 cups of flour, dried rice, or dried beans into the middle of your parchment paper piece. This will be our pie weights. Use enough to fill the pie up to the brim. Place the pie dish into the oven on the middle rack to bake for 15 minutes.
- Brush with vegan egg wash: Carefully remove the parchment paper from the pie dish (if you used flour, you can let the flour cool and store for later use. Just make sure to sift it!). Mix together the soy milk and maple syrup, and use a pastry brush to brush the edges and inside of the pie crust with vegan egg wash. This is used for both sweet and savory pies
- Finish the par-baking: To finish par-baking, poke holes into the bottom of the crust and along the bottom rim of the pie crust to make sure that the pie crust doesn’t puff up in the oven. Place the pie crust back into the oven to continue baking for another 10-12 minutes, or until just turning golden brown. Remove the pie crust from the oven. Then your pie crust is ready to be filled to continue baking in your recipe.
- To blind bake (fully bake) from here: If you’ve placed the crust back into the oven to continue baking in step 8, instead of baking for only an additional 10-12 minutes, you’ll bake for 20 minutes until golden brown and flaky.


Notes
Tip: Use tinfoil and a pie crust shield to protect the crust from burning while baking. Enjoy!
Gluten free: Check out this gluten free vegan pie crust recipe post for all of the details on how to make this pie crust gluten free.
To make a lattice crust:
- Once you get to the first chilling section, separate the dough in half and cover in plastic wrap to chill in the fridge for an hour.
- To make a lattice, place the filling of the pie into the pie crust bottom and set aside (or in the fridge).
- Roll the second dough out to be a circle that measures about 12″ in diameter. To make the lattice, measure 1″ in width for each strip for the lattice, slicing 12 strips, depending on how many you want to go across each side. Drape half of the strips parallel to each other over the pie. Do not seal off the lattice yet. Then lift back the second, fourth, and sixth strip. Place a lattice strip that’s perpendicular across the strips. Place the second, fourth, and sixth strips back. Now pull back the first, third, and fifth strips. Place another lattice strip directly next to the last lattice strip, parallel across the first batch. Place the first, third, and fifth strips back. Repeat, alternating the groups of paralleled strips until you’ve achieved a woven lattice crust. Then continue onto Step 9.


Hello! 🙂
I just made this this afternoon. It’s in the oven right now! Can’t wait. I have some leftover dough. Can I freeze it? And if so, how long? Or shall I keep in the fridge for up to a week maybe?
Thank you. xx
With love,
Lara
Hi Lara! I just saw your comment over on the apple pie recipe page, but yes you can freeze it, for up to 3 months! 🙂 Enjoy!!
Hi!
Salted vegan butter or Unsalted?
Thank you!
You can use salted! However, if you only have unsalted (I love miyokos!), you can add 1/8 tsp of sea salt to the flour mixture!
You added baking soda in the video but it’s not in the recipe text. Please clarify how much baking soda.
Hi! The recipe card on the blog post is correct- the video is outdated, as the recipe has been updated since then. However, the method/gist of the recipe is the same. A new video will be coming soon!
what size pie plate do you use…..8″ or 9″?
This crust will work with both, however with the 8″ you’ll have some leftover pie dough, for which you can use to make more pie designs/cut outs with!
If I’m using cassava flour should I add arrowroot or omit this? Thanks!
Yes definitely include the arrowroot!
OK! thanks! If I’m using coconut oil, do you think this will turn out better with cassava flour or oat flour?
I really love coconut oil with the oat flour! I think it had a really nice flavor!
I’m hoping to use this recipe for thanksgiving, could I use a high powered blender if I don’t have a food processor to make the crust? Thanks!
Aw yay! I hope you do 🙂 Instead of a blender, I’d actually recommend using a pastry cutter and cutting the butter into the flour mixture- you’ll yield a better pie texture!
Can I freeze the pies? If so do I do that before I bake?
Hi Jenna! You can assemble the pie and freeze it entirely before baking! However, I’d place the pie in the fridge first for 10-15 minutes to make sure the dough is set and you don’t mess up your lattice crust design. Then remove it from the fridge, wrap it tightly, and store in the freezer until you’re ready to bake. Then you can transfer this pie straight from the freezer to the oven, but it will take longer to bake, so just keep that in mind! Alternatively, if you feel more comfortable leaving it out for 30 minutes at room temperature before baking, you can do that as well!
Is there a sub for the arrowroot flour?
Hi Jenna! You can use cornstarch!
Hello,
I’m planning to try this crust recipe. Which brand of cassava flour do you recommend? Thank you!
Hi Lisa! So excited to hear it!! I’ve used Bob’s Red Mill and Terrasoul for this pie crust- both work wonderfully!
Can I take out the maple syrup? I wanted to make a sugar free dough.
Hi there! You can remove the maple syrup, you just might need more chilled water to achieve the dough texture!
I’m traveling for the holidays so I don’t want to take everything with me to make the crust. Could I make these pies on a Saturday and roll them out for the pie on a Wednesday? Will they be okay to stay refrigerated for that long? Excited to make my first pie using your recipe!
Hi Jasmine! Aw so happy you’ll be giving this a go! I would freeze the dough from Saturday to Wednesday, then give it about 2-3 hrs to thaw before rolling! That should do it!! So so excited to hear what you think! My only tip is if this is a pie for Thanksgiving, I test all of our Thanksgiving dessert recipes before making the final version, so if this is your first time making pie, it might be good to do a test crust first to make sure you know how your oven works if you’re partially or fully baking the crust (when I first made pie, I couldn’t figure out why my pie crust was slipping down the sides- now I know it’s because I was stretching the dough too much and not fully chilling it!). But you should be good to go and I know your pie is going to be WONDERFUL!
I just made the pie crust, but it did not come together as a ball. In fact it feels very wet. I used GF flour and the lowest amount of water, thinking that if I need to add more I can. Wondering if I should add more flour? Or just refrigerate as is? Should it be very wet and more like cake batter?
Hi Cristin!! Oh shoot I’m so sorry! What was the GF flour? It needs to be a flour blend that’s made for 1:1 (like Bob’s Red Mill Gluten-Free Baking 1:1 Flour or King Arthur Flour Gluten-Free 1:1 Baking Flour). That way I can see what the issue is better!
You recommend coconut oil in the video, but say you love vegan butter here… do have a preference? I want to make it with cassava flour. Thanks!
Hi Guilianna! You can use either- when I first made this crust, there wasn’t a great vegan butter that I liked, so I always used coconut oil (which also made is nut-free for the nut-allergy folks!). Now, I’ve found a few that I like- Miyoko’s (both the cashew version and the oat version) and Forager Project both work really well here. I personally love the vegan butter because it does give that “buttery” flavor to it without dairy. However, if you have a nut allergy go with the coconut oil, as the oat milk butter can be pricey. If you don’t like the coconut taste, go for refined coconut oil- it has zero coconut flavor to it, but acts a bit like shortening. I hope that helps!
I am getting back into baking after years…. this time around, mainly gluten free. I have always loved baking, but suddenly just stopped because the gluten was too much and all baking traditional ingredients tend to be refined sugar, normal butter, refined flour, etc, things I can no longer have. I always thought it was so hard to bake gluten free, but its not. I have really loved getting back into baking with your website! I think like with everything, you need to study, practice, have patience and see how it turns out for you and make your modifications. I can’t wait to try and make pie crusts!
Wow this guide is so helpful! Thank you!! I am all ready for Thanksgiving! Let’s do this 🙂
Aw enjoy!! I hope you love it!!